Contributing
1. Contribution category
1.1 Bug feedback and fixes
We recommend that whether it is a bug feedback or a fix, an issue is first created to describe the bug in detail, so that the community can find and review the problem and code through the issue record. Bug feedback Issues usually need to include complete description of the bug information and reproducible scenarios so that the community can quickly locate the cause of the bug and fix it. All open issues that contain the #bug tag need to be fixed.
1.2 Functional communication, implementation, refactoring
In the communication process, a detailed description, mechanisms and usage scenarios of the new function (or refactoring) can promote it to be implemented better and faster (including test cases and codes, and CI/CD related work). If you plan to implement a major feature (or refactoring), be sure to communicate with the core development team through Issue or other means so that everyone can promote it in the most efficient way. Issues opened with the label of #feature are all new features that need to be implemented, and issues opened with the label of #enhancement are all features that need to be improved and refactored.
1.3 Issue Q&A
Helping answering the questions in the Linkis community is a very valuable way to contribute; there will always be new users in the community that will keep coming in. While helping new users, you can also show your expertise.
1.4 Documentation refinements
You can find linkis documentations at linkis-Website, and the supplement of the document is also crucial to the development of Linkis.
1.5 Other
Including participating in and helping to organize community exchanges, community operation activities, etc., and other activities that can help the Linkis project and the community.
2. How to contribution
2.1 Branch structure
There are many branches,including temporary branches,in Linkis repository,but only three of them matter:
- master: main development branch;
- release-: stable release version;
- feature-*: Development branches for some larger new features that need to be jointly developed by the community
2.1.1 Concept
Original warehouse: https://github.com/apache/linkis The apache warehouse of linkis is called the original warehouse in the text
Fork library: From https://github.com/apache/linkis fork to your own personal repository to become a fork library
2.1.2 Synchronize the latest code of the original warehouse branch to your own fork library
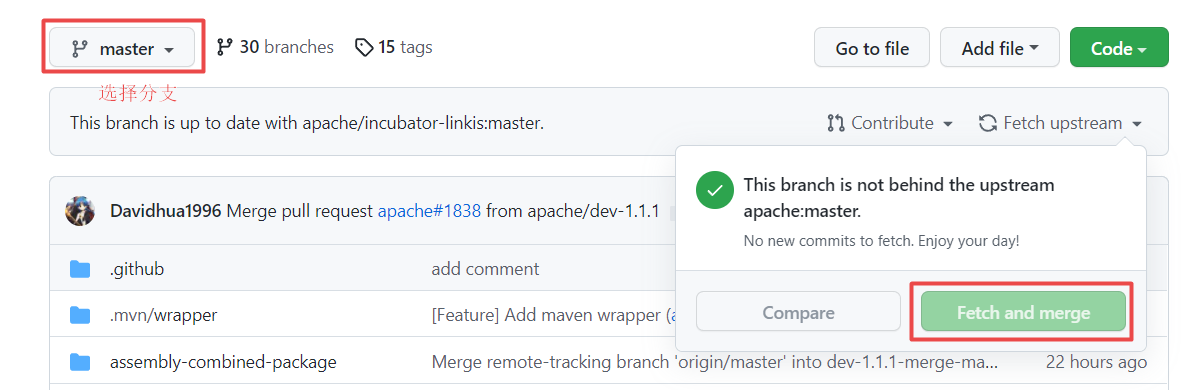
- Enter the user project page and select the branch to be updated
- Click fetch upstream under the code download button and select fetch and merge (if the branch of your own fork library is accidentally polluted, you can delete the branch and synchronize the new branch of the original warehouse to your own fork library. For instructions, see Synchronize the new branch of the original repository to your own fork repository)
2.1.3 Synchronize the new branch of the original repository to your own fork repository
Scene: There is a new branch in the original warehouse, but the forked library does not have this branch (you can choose to delete and re-fork, but the changes that have not been merged to the original warehouse will be lost)
Operate in your own clone's local project
- Add the original apache warehouse image to the local
git remote add apache git@github.com:apache/linkis.git
- Pull the apache image information to the local
git fetch apache
- Create a local branch based on the new branch that needs to be synced
git checkout -b dev-1.1.4 apache/dev-1.1.4
- Push the local branch to your own warehouse, if your own warehouse does not have a dev-1.1.4 branch, it will create a dev-1.1.4 branch
git push origin dev-1.1.4:dev-1.1.4
- Delete the upstream branch
git remote remove apache
- Update the branch
git pull
2.1.4 A pr process
Confirm the base branch of the current development (usually the current version in progress, such as version 1.1.0 currently under development by the community, then the branch is dev-1.1.0, if you are not sure, you can ask in the community group or in @relevant classmates in the issue)
Synchronize the latest code of the original warehouse branch to its own fork warehouse branch , See the guideline Synchronize the new branch of the original repository to your own fork repository
Based on the development branch, pull the new fix/feature branch (do not modify it directly on the original branch, if the subsequent PR is merged in the squash method, the submitted commit records will be merged into one)
git checkout -b dev-1.1.4-fix dev-1.1.4
git push origin dev-1.1.4-fix:dev-1.1.4-fix
- Develop
- Submit pr (if it is in progress and the development has not been completely completed, please add the WIP logo to the pr title, such as
[WIP] Dev 1.1.1 Add junit test code for [linkis-common]; associate the corresponding issue, etc.) - Waiting to be merged
- Delete the fix/future branch (you can do this on the github page)
git branch -d dev-1.1.4-fix
git push
Please note: The dev branch of major features will be named with corresponding naming instructions in addition to the version number, such as: dev-0.10.0-flink, which refers to the flink feature development branch of 0.10.0.
2.2 Development guidelines
Linkis front-end and back-end code share the same code base, but they are separated in development. Before starting the development, please fork the Linkis project to your Github Repositories. When developing, please develop based on the Linkis code base in your Github Repositories.
We recommend to clone the dev branch and name it dev-fix for development. At the same time, create a new dev-fix branch in your own warehouse and modify it directly on the original branch. If the subsequent PR is merged in the squash method, the submitted commit records will be merged into one
//pull the branch
git clone https://github.com/{githubid}/linkis.git --branch dev
//Generate local dev-fix branch according to dev
git checkout -b dev-fix dev
//Push the local dev-fix branch to your own repository
git push origin dev-fix dev-fix
2.2.1 Backend
The user configuration is in the project root directory /config/, the project startup script and the upgrade patch script are in the project root directory /bin/, the back-end code and core configuration are in the server/ directory, and the log is in the project root directory /log/. Note: The project root directory referred to here refers to the directory configured by the environment variable LINKIS_HOME, and environment variables need to be configured during IDE development. For example, Idea's priority regarding environment variable loading: Configured in Run/Debug Configurations Environment variables —> System environment variables cached by IDE.
2.2.1.1 Directory structure
- Script
├── bin              # script directory
  ├── install.sh     # One-click deployment script
  ├── start-all.sh   # One-click start script
  └── stop-all.sh    # One-click stop script
- Configuration
├── config            # User configuration directory
  ├── config.sh       # One-click deployment configuration file
  ├── db.sh           # One-click deployment database configuration
Code directory structure
For details, see Linkis Code Directory Structure
Log directory
├── logs # log root directory
2.2.1.2 Environment variables
Configure system environment variable or IDE environment variable LINKIS_HOME, it is recommended to use IDE environment variable first.
2.2.1.3 Database
- Create the Linkis system database by yourself;
- Modify the corresponding information of the database in conf/db.sh and execute bin/install.sh or directly import db/linkis_*.sql on the database client.
2.2.1.4 Configuration file
Modify the application.yml file in the resources/ directory of each microservice to configure related properties.
2.2.1.5 Packaging
- To obtain a complete release package, you need to modify the relevant version information in /assembly/src/main/assembly/assembly.xml in the root directory, and then execute:
mvn clean packagein the root directory; - To obtain the package of each module, simple execute
mvn clean packagein the module directory.
2.3 Issue submission guidelines
- If you still don’t know how to initiate a PR to an open source project, please refer to About issues
- Issue name, which should briefly describe your problem or suggestion in one sentence; for the international promotion of the project, please write the issue in English or both Chinese and English.
- For each Issue, please bring at least two labels, component and type, such as component=Computation Governance/EngineConn, type=Improvement. Reference: issue #590
2.4 Pull Request(PR) submission guidelines
- If you still don’t know how to initiate a PR to an open source project, please refer to About pull requests Whether it is a bug fix or a new feature development, please submit a PR to the dev-* branch.
- PR and submission name follow the principle of
<type>(<scope>): <subject>, for details, please refer to Ruan Yifeng's Commit message and Change log writing guide this article. - If the PR contains new features, the document update should be included in this PR.
- If this PR is not ready to merge, please add [WIP] prefix to the head of the name (WIP = work-in-progress).
- All submissions to dev-* branches need to go through at least one review before they can be merged
2.5 Review standard
Before contributing code, you can find out what kind of submissions are popular in Review. Simply put, if a submission can bring as many gains as possible and as few side effects or risks as possible, the higher the probability of it being merged, the faster the review will be. Submissions with high risk and low value are almost impossible to merge, and may be rejected Review.
2.5.1 Gain
- Fix the main cause of the bug
- Add or fix a function or problem that a large number of users urgently need
- Simple and effective
- Easy to test, with test cases
- Reduce complexity and amount of code
- Issues that have been discussed by the community and identified for improvement
2.5.2 Side effects and risks
- Only fix the surface phenomenon of the bug
- Introduce new features with high complexity
- Add complexity to meet niche needs
- Change stable existing API or semantics
- Cause other functions to not operate normally
- Add a lot of dependencies
- Change the dependency version at will
- Submit a large number of codes or changes at once
2.5.3 Reviewer notes
- Please use a constructive tone to write comments
- If you need to make changes by the submitter, please clearly state all the content that needs to be modified to complete the Pull Request
- If a PR is found to have brought new problems after the merger, the Reviewer needs to contact the PR author and communicate to solve the problem; if the PR author cannot be contacted, the Reviewer needs to restore the PR
3, Outstanding contributor
3.1 About committers (Collaborators)
3.1.1 How to become committer
If you have submitted a valuable PR to Linkis and have been merged, or contributed continuously for more than half a year, and have led the release of at least one version, you can find a PMC members of the Linkis project through the official WeChat group, if he is willing to nominate you as a committer , And are willing to state your contribution to all PMC members and Committer, then a vote will be initiated; PMC members and other Committers will vote together to decide whether to allow you to join, if you get enough votes, you will become Committer of the Linkis project .
3.1.2 Committer's
- You can join the official developer WeChat group to participate in discussions and formulate Linkis development plans
- Can manage Issues, including closing and adding tags
- Can create and manage project branches, except for master and dev-* branches
- You can review the PR submitted to the dev-* branch
- Can apply to become a Committee member
3.2 About committee
3.2.1 How to become a committee member
If you are the Committer of the Linkis project, and all your contributions have been recognized by other Committee members, you can apply to become a member of the Linkis Committee, and other Committee members will vote together to decide whether to allow you to join. If you pass unanimously, you will become a member of the Linkis Committee.
3.2.2 Rights of committee members
- You can merge PRs submitted by other Committers and contributors to the dev-** branch
- Participate in determining the roadmap and development direction of the Linkis project
- Can participate in the new version release