Apache publishing guide
This article takes the release of 1.0.3 Apache version as an example. If it is a non-Apache version, please refer to the detailed information https://incubator.apache.org/guides/releasemanagement.html
Understand the content and process of Apache's release. Source Release is the focus of Apache’s attention and is also a required content for release; Binary Release is optional. Please refer to the following link to find more ASF release guidelines:
Both apache's maven and SVN repositories use GPG signatures to verify the legitimacy of material files
1 Tool preparation
Required when this publisher is publishing for the first time
Mainly include the preparation of the signature tool GnuPG, Maven repository certification
1.1 Install GPG
(Take the Window system as an example, if the git client has been installed, gpg may already exist, and there is no need to install it again)
Download the binary installation package (GnuPG binary releases) at GnuPG official website. The latest version is Gpg4win-3.1.16 2021-06-11 After downloading, please complete the installation operation first Note: The commands of GnuPG 1.x version and 2.x version are slightly different. The following description takes 2.2.28 as an example After installation, the gpg command is added to the system environment variables and is available
#Check the version, it should be 2.x
$ gpg --version
1.2. Generate key with gpg
Note the following points:
- The mailbox used should be apache mailbox
- It is best to use pinyin or English for the name, otherwise garbled characters will appear
According to the prompt, generate the key
$ gpg --full-gen-key
gpg (GnuPG) 2.2.28; Copyright (C) 2021 g10 Code GmbH
This is free software: you are free to change and redistribute it.
There is NO WARRANTY, to the extent permitted by law.

Please select what kind of key you want:
   (1) RSA and RSA (default)
   (2) DSA and Elgamal
   (3) DSA (sign only)
   (4) RSA (sign only)
  (14) Existing key from card
Your selection? 1 #here enter 1
RSA keys may be between 1024 and 4096 bits long.
What keysize do you want? (3072) 4096 #Enter 4096 here
Requested keysize is 4096 bits
Please specify how long the key should be valid.
         0 = key does not expire
      <n> = key expires in n days
      <n>w = key expires in n weeks
      <n>m = key expires in n months
      <n>y = key expires in n years
Key is valid for? (0) 0 #here enter 0
Key does not expire at all
Is this correct? (y/N) y #Enter y here

GnuPG needs to construct a user ID to identify your key.

Real name: mingXiao #Enter Pinying or English name here
Email address: xiaoming@apache.org #Enter the email address of apache here
Comment: for apache release create at 20211110 #Enter some comments here, can be empty
You selected this USER-ID:
    "mingXiao (for apache release create at 20211110) <xiaoming@apache.org>"

Change (N)ame, (C)omment, (E)mail or (O)kay/(Q)uit? O #Enter O here
We need to generate a lot of random bytes. It is a good idea to perform
some other action (type on the keyboard, move the mouse, utilize the
disks) during the prime generation; this gives the random number
generator a better chance to gain enough entropy.

# At this time, a dialog box will pop up, asking you to enter the key for this gpg. you need to remember that it will be used in subsequent steps.
┌─────────────────────────────────────────────────────┐
│ Please enter this passphrase to protect your new key│
│                                                     │
│ Passphrase: _______ no less than 8 digits _________ │
│ Repeat: ___________________________________________ │
│ <OK> <Cancel>                                       │
└─────────────────────────────────────────────────────┘
#After entering the secret key, a certain random action needs to be performed to generate encrypted prime numbers. After creation, the following information will be output
gpg: key 1AE82584584EE68E marked as ultimately trusted
gpg: revocation certificate stored as'C:/Users/xxx/AppData/Roaming/gnupg/openpgp-revocs.d\E7A9B12D1AC2D8CF857AF5851AE82584584EE68E.rev'
public and secret key created and signed.

pub rsa4096 2021-11-10 [SC]
      E7A9B12D1AC2D8CF857AF5851AE82584584EE68E
uid mingXiao (for apache release create at 20211110) <xiaoming@apache.org>
sub rsa4096 2021-11-10 [E]
1.3. Upload the generated key to the public server
$ gpg --keyid-format SHORT --list-keys
pub rsa4096/584EE68E 2021-11-10 [SC] #584EE68E is the key id
      E7A9B12D1AC2D8CF857AF5851AE82584584EE68E
uid [ultimate] mingXiao (for apache release create at 20211110) <xiaoming@apache.org>
sub rsa4096/399AA54F 2021-11-10 [E]

# Send public key to keyserver via key id
$ gpg --keyserver keyserver.ubuntu.com --send-key 584EE68E
# Among them, keyserver.ubuntu.com is the selected keyserver, it is recommended to use this, because the Apache Nexus verification uses this keyserver
1.4. Check whether the key is created successfully
Verify whether it is synchronized to the public network. It takes about a minute to find out. If it is not successful, you can upload and retry several times
# method one
$ gpg --keyserver keyserver.ubuntu.com --recv-keys 584EE68E #584EE68E is the corresponding key id

#Results are as follows
gpg: key 1AE82584584EE68E: "mingXiao (for apache release create at 20211110) <xiaoming@apache.org>" not changed
gpg: Total number processed: 1
gpg: unchanged: 1

# method two
Go directly to https://keyserver.ubuntu.com/ and enter the username mingXiao to search the query results
1.5 Add the gpg public key
This step requires the use of SVN, please download and install the SVN client first, Apache uses svn to host the project’s published content
Linkis DEV branch https://dist.apache.org/repos/dist/dev/linkis
Linkis Release branch https://dist.apache.org/repos/dist/release/linkis
1.5.1 Add public key to keys in dev branch
Used to release RC version
$ mkdir -p linkis_svn/dev
$ cd linkis_svn/dev

$ svn co https://dist.apache.org/repos/dist/dev/linkis
# This step is relatively slow, and all versions will be copied. If the network is broken, use svn cleanup to delete the lock and re-execute it, and the upload will be resumed.
$ cd linkis_svn/dev/linkis

# Append the KEY you generated to the file KEYS, it is best to check if it is correct after appending
$ (gpg --list-sigs YOUR_NAME@apache.org && gpg --export --armor YOUR_NAME@apache.org) >> KEYS
# If there is a KEYS file before, it is not needed
$ svn add KEYS
#Submit to SVN
$ svn ci -m "add gpg key for YOUR_NAME"
1.5.2 Add public key to keys in release branch
Used to release the official version
$ mkdir -p linkis_svn/release
$ cd linkis_svn/release

$ svn co https://dist.apache.org/repos/dist/release/linkis
# This step is relatively slow, and all versions will be copied. If the network is broken, use svn cleanup to delete the lock and re-execute it, and the upload will be resumed.

$ cd linkis
# Append the KEY you generated to the file KEYS, it is best to check if it is correct after appending
$ (gpg --list-sigs YOUR_NAME@apache.org && gpg --export --armor YOUR_NAME@apache.org) >> KEYS
# If there is a KEYS file before, it is not needed
$ svn add KEYS
#Submit to SVN
$ svn ci -m "add gpg key for YOUR_NAME"
1.6 Configure apache maven address and user password settings
In the maven configuration file ~/.m2/settings.xml, add the following <server> item
For encryption settings, please refer to here
<?xml version="1.0" encoding="UTF-8"?>
<settings xsi:schemaLocation="http://maven.apache.org/SETTINGS/1.1.0 http://maven.apache.org/xsd/settings-1.1.0.xsd" xmlns="http://maven .apache.org/SETTINGS/1.1.0"
    xmlns:xsi="http://www.w3.org/2001/XMLSchema-instance">
  <servers>
    <!-- Apache Repo Settings -->
    <server>
        <id>apache.snapshots.https</id>
         <!-- APACHE LDAP username -->
        <username>{user-id}</username>
         <!--APACHE LDAP password (using the password encrypted by the mvn secret machine mechanism) -->
        <password>{user-pass}</password>
    </server>
    <server>
        <id>apache.releases.https</id>
        <username>{user-id}</username>
        <password>{user-pass}</password>
    </server>
  </servers>
<profiles>
    <profile>
      <id>apache-release</id>
      <properties>
        <!-- Your GPG Keyname here -->
        <gpg.keyname>Your KEYID</gpg.keyname>
        <!-- Use an agent: Prevents being asked for the password during the build -->
        <gpg.useagent>true</gpg.useagent>
        <gpg.passphrase>The password of your private key</gpg.passphrase>
      </properties>
    </profile>
</profiles>
</settings>
2 Prepare material package & release of apache nexus
2.1 Prepare branch/tag/release notes
Pull the new branch from the branch to be released as the branch to be released. If you want to release the ${release_version} version now, check out the new branch release-${release_version}-${condition_version} from the branch to be released, and all after that The operations are all performed on the release-${release_version}-${condition_version} branch, and merge into the main branch after the final release is completed.
If the source branch currently developed is dev-1.0.3, version 1.0.3 needs to be released -Create branch: release-1.0.3-rc1 -Create tag: release-1.0.3-rc1
Sort out the content description of this change and release, sort by [module][pr_url].
Enter the creation page https://github.com/apache/linkis/releases/new
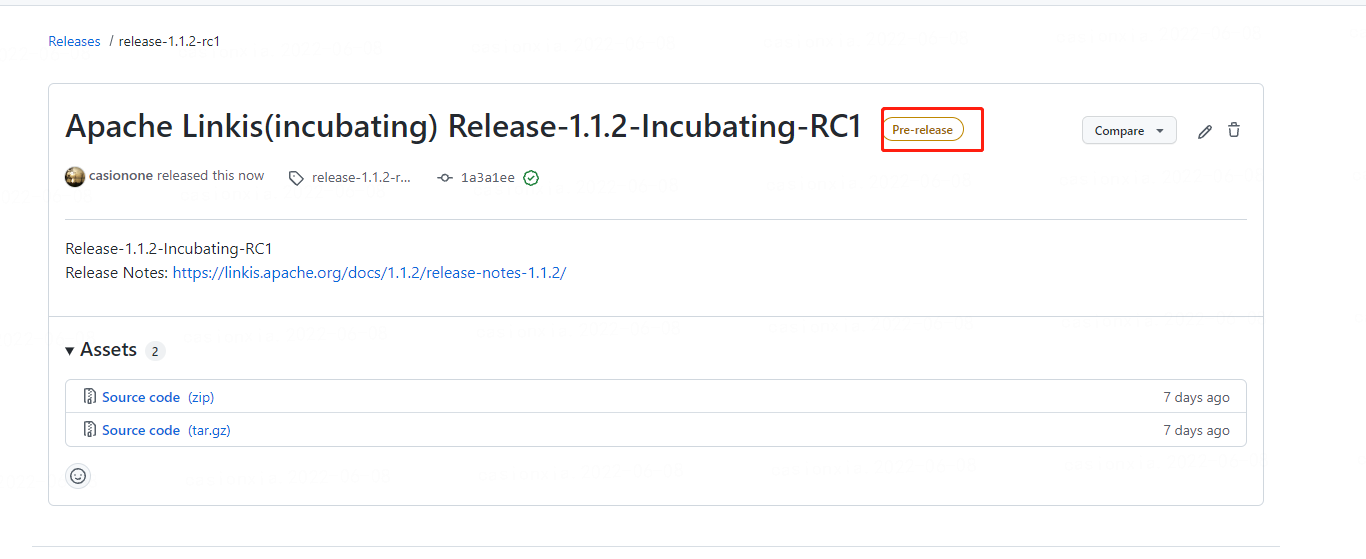
Create a release based on the previous release-1.0.3-rc1 tag, and check This is a pre-release to write the release notes.
- After the main repository apache/linkis is ready to release the branch/tag/release notes, please fork to your own repository and perform the following steps
2.2 Version number confirmation
If the version number is incorrect, you need to modify the version number to
$ mvn versions:set -DnewVersion=1.0.3

Modify the configuration in pom.xml
<linkis.version>1.0.3</linkis.version>
Check whether the code is normal, including the version number, the compilation is successful, the unit test is all successful, the RAT check is successful, etc.
#build check
$ mvn clean install -Dmaven.javadoc.skip=true
#RAT LICENSE check
#It can be executed within 5 minutes normally. If the execution has not ended for a long time, please check whether additional files that need not be checked have been added due to actions such as compiling.
$ mvn apache-rat:check

#Check all rat files after no exception
$ find ./ -name rat.txt -print0 | xargs -0 -I file cat file > merged-rat.txt
If the check is abnormal, please check whether additional unnecessary files have been added due to compilation and other actions, which can be removed.
The whitelist file of rat check is configured in the apache-rat-plugin plugin configuration in the outer pom.xml.
Check all license information in merged-rat.txt, and note that Binaries and Archives files are 0.
Notes: 0
Binaries: 0
Archives: 0
0 Unknown Licenses
2.3 Publish jar package to apache nexus repository
# Start to compile and upload, it takes about 1h40min
$ mvn -DskipTests deploy -Prelease -Dmaven.javadoc.skip=true
1 If a network proxy is used or the requester's ip changes, it may cause the maven side to split in order to upload records multiple times. This needs to be closed first and re-deployed. It is best to turn off the network proxy 2 If there is a timeout, you need to re-deploy
After the above command is executed successfully, the release package will be automatically uploaded to Apache's staging repository. All Artifacts deployed to the remote maven repository will be in the staging state. Visit https://repository.apache.org/#stagingRepositories and log in using the Apache LDAP account. You will see the uploaded version, and the content in the Repository column is ${STAGING.REPOSITORY}. Click Close to tell Nexus that the build is complete, and only then is the version available. If there is a problem with the electronic signature, Close will fail. You can check the failure information through Activity.
At the same time, the binary file linkis-dist/target/apache-linkis-1.0.3-bin.tar.gz is also generated
Step 2.4-3.3 execute the command, merge it in the release.sh script, or execute it through the release.sh script (See appendix at the end of this article)
2.4 Package source code
$ mkdir -p dist/apache-linkis

#based on the release-1.0.3-rc1 branch to package the source code tar.gz material
#--prefix=apache-linkis-1.0.3-src/ Note that the `/` archive will be in the apache-linkis-1.0.3-src folder after decompression
#A pax_global_header file will be generated to record the commitid information. Without the --prefix, it will cause pax_global_header to be in the same level directory as the source file after decompression

$ git archive --format=tar.gz --output="dist/apache-linkis/apache-linkis-1.0.3-src.tar.gz" --prefix=apache-linkis-1.0.3-src/  release-1.0.3-rc1
2.5 Copy binary files
After step 2.3 is executed, the binary file has been generated, located in linkis-dist/target/apache-linkis-1.0.3-bin.tar.gz
$ cp linkis-dist/target/apache-linkis-1.0.3-bin.tar.gz dist/apache-linkis
2.6 Package front-end management console
2.6.1 Install Node.js
Download Node.js to the local and install it. Download link: http://nodejs.cn/download/ (node v16 version is recommended) This step only needs to be performed the first time you use it.
2.6.2 Install dependencies
Execute the following commands in the terminal command line:
#Enter the project WEB root directory
$ cd linkis/linkis-web
#Required dependencies for installation project
$ npm install
This step only needs to be performed the first time you use it.
Notice:
1. An error is reported in the npm install step under Windows:
Error: Can't find Python executable "python", you can set the PYTHON env variable
Install windows-build-tools (administrator rights)
$ npm install --global --production windows-build-tools
$ Install node-gyp
$ npm install --global node-gyp

2. If the compilation fails, please follow the steps below to clean up and re-execute
#Enter the project working directory, delete node_modules
$ rm -rf node_modules
#Delete package-lock.json
$ rm -rf package-lock.json
#Clear npm cache
$ npm cache clear --force
#Re-download dependencies
$ npm install
2.6.3 Package console project
Execute the following instructions on the terminal command line to package the project and generate a compressed deployment installation package. Check linkis-web/package.json, linkis-web/.env files, and check whether the version number of the front-end management console is correct.
$ npm run build
After the above command is successfully executed, the front-end management console installation package apache-linkis-${version}-web-bin.tar.gz will be generated
2.6.4 Copy console installation package
After step 2.6.3 is executed, the front-end management console installation package has been generated, located at linkis-web/apache-linkis-1.0.3-web-bin.tar.gz
$ cp linkis-web/apache-linkis-1.0.3-web-bin.tar.gz dist/apache-linkis
2.7 Sign the source package/binary package/sha512
$ cd dist/apache-linkis

$ for i in *.tar.gz; do echo $i; gpg --armor --output $i.asc --detach-sig $i; done # Calculate signature

$ for i in *.tar.gz; do echo $i; sha512sum  $i > $i.sha512 ; done # Calculate SHA512
2.8 Check whether the generated signature/sha512 is correct
Verify that the signature is correct as follows:
$ cd dist/apache-linkis
$ for i in *.tar.gz; do echo $i; gpg --verify $i.asc $i; done
If something like the following appears, the signature is correct. Keyword: Good signature
     apache-linkis-xxx-src.tar.gz
     gpg: Signature made XXXX
     gpg: using RSA key XXXXX
     gpg: Good signature from "xxx @apache.org>"
Verify that sha512 is correct as follows:
$ cd dist/apache-linkis
$ for i in *.tar.gz; do echo $i; sha512sum --check $i.sha512; done
The detailed verification process can be found in Verification Candidate Version
3 Publish the apache svn repository
- The Linkis DEV branch is used to store the source code and binary materials of the candidate version
- The RC version voted by the Linkis Release branch will eventually be moved to the release library
3.1 Check out the Linkis release directory
Check out the Linkis distribution directory from the Apache SVN dev directory.
$ svn co https://dist.apache.org/repos/dist/dev/linkis dist/linkis_svn_dev
3.2 Add the content to be published to the svn directory
Create a version number directory and name it in the way of ${release_version}-${RC_version}, RC_version starts from 1, that is, the candidate version starts from RC1. During the release process, there is a problem that causes the vote to be rejected, and it needs to be corrected and iterated. RC version, RC version number should be +1.
For example: 1.0.3-RC1 version is voted, if the vote is passed without any problems, the RC1 version material will be released as the final version material.
If there is a problem (when voting in the linkis/incubator community, voters will strictly check various release requirements and compliance issues) and need to be corrected. After the correction, the vote will be re-initiated. The candidate version for the next vote is 1.0.3- RC2.
$ mkdir -p dist/linkis_svn_dev/1.0.3-RC1
Add the source code package, binary package, and Linkis executable binary package to the SVN working directory.
$ cp -f dist/apache-linkis/* dist/linkis_svn_dev/1.0.3-RC1
3.3 Submit apache svn
$ cd dist/linkis_svn_dev/

# Check svn status
$ svn status
# Add to svn version
$ svn add 1.0.3-RC1
$ svn status
# Submit to svn remote server
$ svn commit -m "prepare for 1.0.3-RC1"
If Chinese garbled characters appear in the svn command, you can try to set the encoding format (set the encoding format: export LANG=en_US.UTF-8).
4 Verify release candidates
For details, please refer to How to Verify release
5 Initiates a vote
Linkis is still in the incubation stage and needs to vote twice
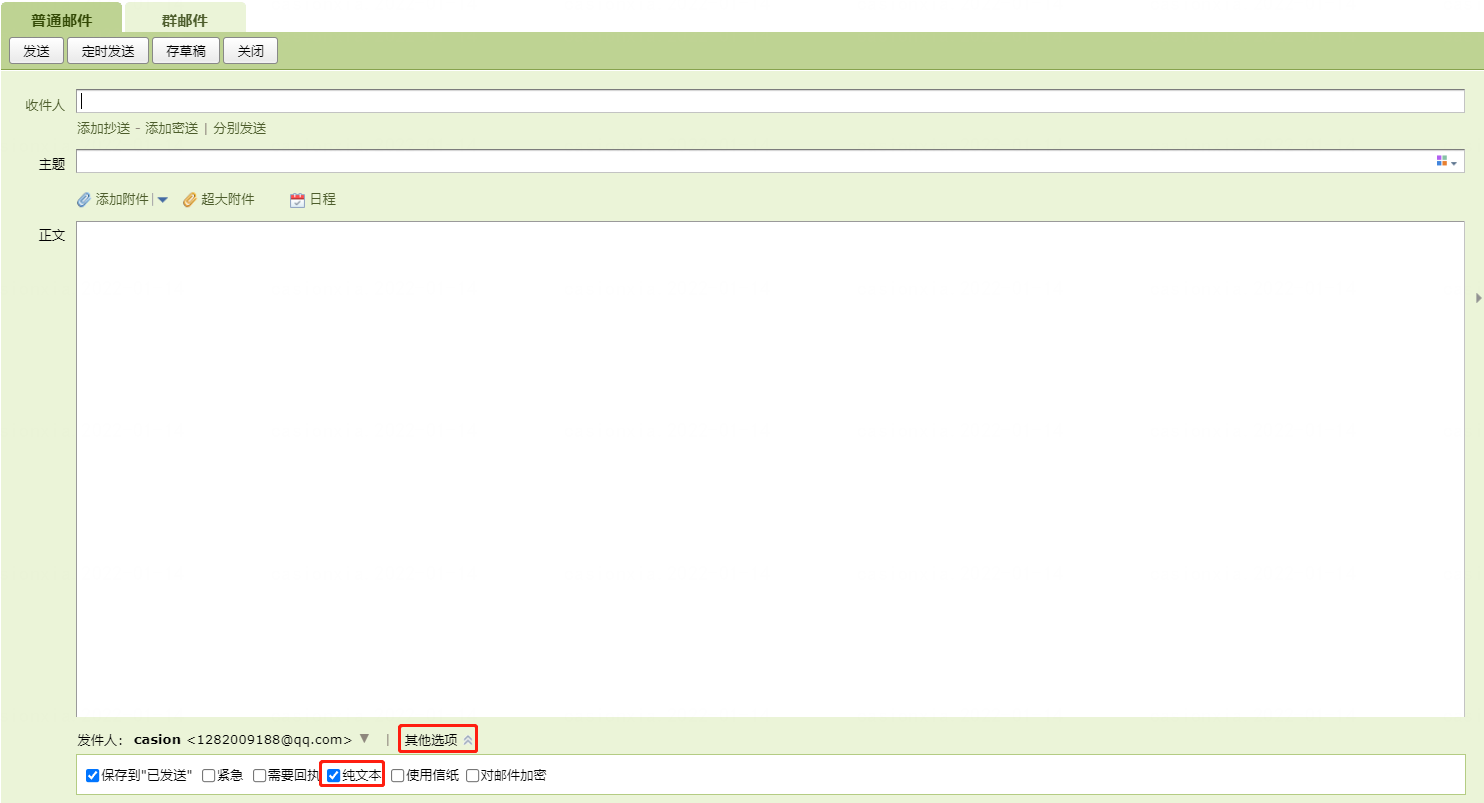
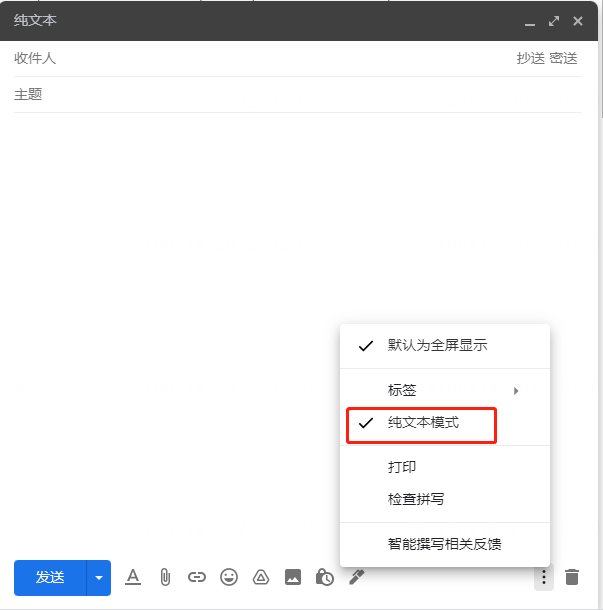
Please use your apache.org mailbox to send emails, and use plain text mode, for details see Appendix-Mail Switching Plain Text Format
All links to checksums, signatures, and public keys must refer to the main Apache website https://downloads.apache.org/ and should use https://(SSL). For example: https://downloads.apache.org/linkis/KEYS
- To vote in the Linkis community, send an email to:
dev@linkis.apache.org
5.1 Linkis community voting stage
To vote in the Linkis community, send a voting email to
dev@linkis.apache.org. PMC members needs to check the correctness of the version according to the document, and then vote. After at least three+1 PMC membervotes have been counted, you can enter the next stage of voting.Announce the results of the voting and send an email to the result of the voting to
dev@linkis.apache.org.
5.1.1 Linkis community voting template
title:
[VOTE] Release Apache Linkis ${release_version} ${rc_version}

content:

Hello Linkis Community,

    This is a call for vote to release Apache Linkis version ${release_version}-${rc_version}.

    Release notes:
        https://linkis.apache.org/download/release-notes-${release_version}

    The release candidates:
        https://dist.apache.org/repos/dist/dev/linkis/${release_version}-${rc_version}/

    Maven artifacts are available in a staging repository at:
        https://repository.apache.org/content/repositories/orgapachelinkis-{staging-id}

    Git branch for the release:
        https://github.com/apache/linkis/tree/${release_version}-${rc_version}

    Keys to verify the Release Candidate:
        https://downloads.apache.org/linkis/KEYS

    GPG user ID:
    ${YOUR.GPG.USER.ID}

    The vote will be open for at least 72 hours or until necessary number of votes are reached.

    Please vote accordingly:

    [] +1 approve
    [] +0 no opinion
    [] -1 disapprove with the reason

    Checklist for reference:

    [] Download links are valid.
    [] Checksums and PGP signatures are valid.
    [] Source code distributions have correct names matching the current release.
    [] LICENSE and NOTICE files are correct for each Linkis repo.
    [] All files have license headers if necessary.
    [] No unlicensed compiled archives bundled in source archive.

    Steps to validate the release,Please refer to:
        https://linkis.apache.org/community/how-to-verify

Thanks,
${Linkis Release Manager}
5.1.2 Announce voting result template
title:
[RESULT][VOTE] Release Apache Linkis ${release_version} ${rc_version}

content:
Hello Apache Linkis PMC  and Community,

    The vote closes now as 72hr have passed. The vote PASSES with

    xx (+1 binding) votes from the PMC members,

    - member one
    - member two
    - member three
    ...

    xx (+1 non-binding) votes from the rest of the developer community,
    and no further 0 or -1 votes.

    The vote thread: {vote_mail_address}

    If this vote passes also, the release is accepted and will be published.

Thank you for your support.
${Linkis Release Manager}
5.2 Others
Because there is a problem with the content of the voting email (not a material problem, such as a link problem
- If it is discovered earlier, you can cancel the previous vote and vote again. If it has been done for a long time, the release manager can directly reply to the voting email.
- RCX can remain unchanged, the source material will not be modified, and the title of the email can be added (Round2) to distinguish such as
[VOTE] Release Apache Linkis 1.3.0-RC2 (Round2)
Mail thread problem
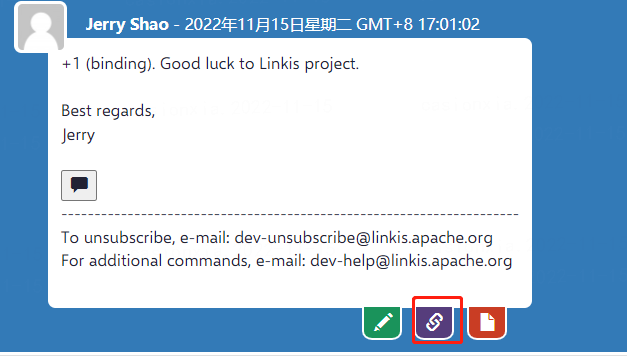
All mailing archives can be found at dev@linkis.apache.org, a mailing thread, via the [ Permanent link to this email] Get the accessible url address of the email
Some mailboxes 163/sina reply with the Chinese "reply" by default, which will cause the apache mail to be recognized as a new thread mail, and the configuration needs to be modified.

6 Official release
6.1 Migrating source and binary packages
The path name of release cannot carry the rc identifier
Move source and binary packages from svn's dev directory to the release directory
#Mobile source package and binary package
$ svn mv https://dist.apache.org/repos/dist/dev/linkis/${release_version}-${rc_version} https://dist.apache.org/repos/dist/release/linkis/${release_version} -m "transfer packages for ${release_version}-${rc_version}"

# The following operations decide whether to update the key of the release branch according to the actual situation
# Clear the KEYS in the original release directory
$ svn delete https://dist.apache.org/repos/dist/release/linkis/KEYS -m "delete KEYS"

# Copy the dev directory KEYS to the release directory
$ svn cp https://dist.apache.org/repos/dist/dev/linkis/KEYS https://dist.apache.org/repos/dist/release/linkis/ -m "transfer KEYS for ${release_version}-${rc_version}"
6.2 Confirm whether the packages under dev and release are correct
- Confirm that
${release_version}-${rc_version}under dev has been removed - Delete the release packages of the previous version in the release directory, these packages will be automatically saved here
#Before deleting, please confirm that the previous version release package has been updated to https://downloads.apache.org/linkis/
$ svn delete https://dist.apache.org/repos/dist/release/linkis/${last_release_version} -m "Delete ${last_release_version}"
6.3 Release version in apache staging repository
- Log in to http://repository.apache.org , log in with your Apache account
- Click on Staging repositories on the left,
- Search for Linkis keywords, select your recently uploaded repository, and the repository specified in the voting email
- Click the
Releasebutton above, this process will perform a series of checks
It usually takes 24 hours to wait for the repository to synchronize to other data sources
6.4 New version document release and download page update
Document release
Create a new version, create a release version based on the current version
step1 archive ${publish_version} version document
npm install
npm run docusaurus docs:version ${publish_version}
step2 Copy the new Chinese version document
cd i18n/zh-CN/docusaurus-plugin-content-docs
cp -r current version-${publish_version}
cp -r current.json version-${publish_version}.json
step3 modify version.label
# The current.json file is modified as follows
"message": "Next(${publish_version})" --> "message": "Next(${next_version})"

# version-${publish_version}.json file is modified as follows
"message": "Next(${publish_version})", --> "message": "${publish_version}"
Modify configuration docusaurus.config.js
 versions: {
        current: {
          path: '1.2.0',
          label: 'Next(1.2.0)'
        },
        '1.1.1': {
          path: 'latest',
        },
      }
->
  versions: {
         current: {
           path: '1.1.3',
           label: 'Next(1.1.3)'
         },
         '1.2.0': {
           path: 'latest',
         },
       }

 items: [
        //Increase
        {label: '${publish_version}', to: '/docs/latest/about/introduction'},
        //Revise
        {label: '${current_version}', to: '/docs/latest/about/introduction'},
        -->
        {label: '${current_version}', to: '/docs/${current_version}/about/introduction'},
        //Revise
        {label: 'Next(${publish_version})', to: '/docs/${publish_version}/about/introduction'},
        -->
        {label: 'Next(${next_version})', to: '/docs/${next_version}/about/introduction'},
        //Revise
        existingPath.replace('/latest', '/${current_version}')
        -->
        existingPath.replace('/latest', '/${publish_version}')
]
Update download page
Chinese and English documents must be updatedLinkis official website download address should point to the official address of apache
After waiting and confirming that the new release version is synchronized to the Apache mirror (https://downloads.apache.org/linkis/), update the following page:
- https://linkis.apache.org/zh-CN/download/main
- https://linkis.apache.org/download/main
- https://linkis.apache.org/zh-CN/download/release-notes-xxx (remove rc)
- https://linkis.apache.org/download/release-notes-1.3.0 (remove rc)
6.5 GitHub version released
Once the git tag is created, it cannot be deleted (the branch can be deleted), so make sure that the previous steps are all right before creating the tag.
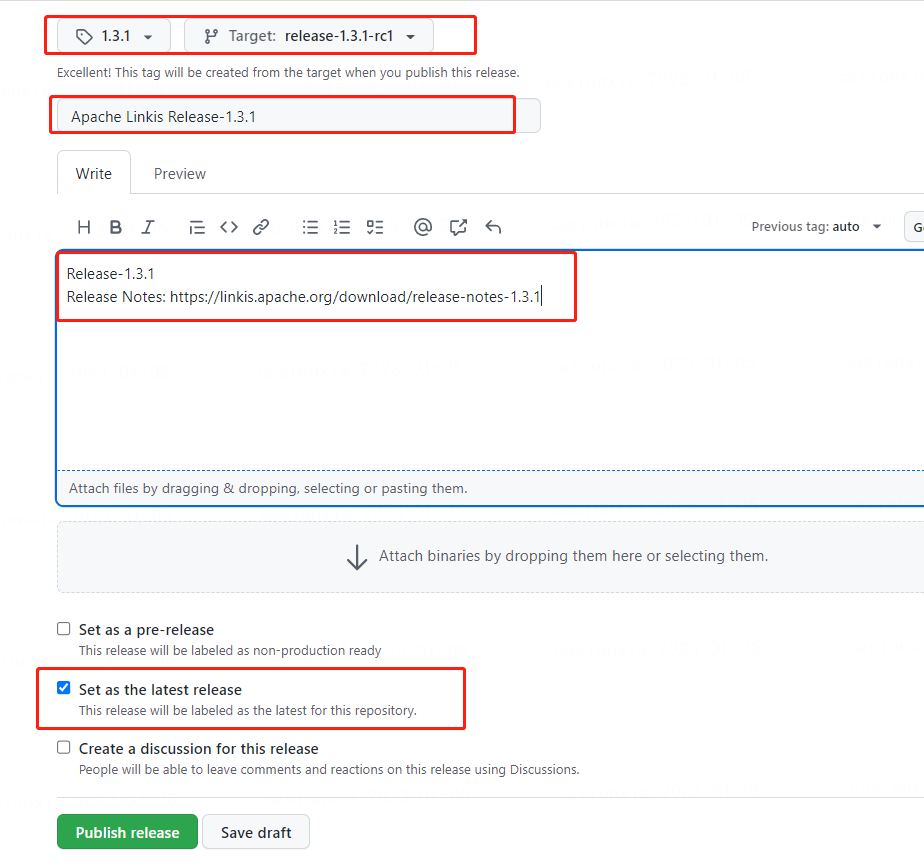
step1 Create a new github release
Go to the creation page https://github.com/apache/linkis/releases/new
Create a tag named 1.1.2 based on the previous release-1.1.2-rc1 branch,
Fill in the title Apache Linkis Release-1.1.2, write the release notes https://linkis.apache.org/download/release-notes-1.1.2 link of this version
Release-1.1.2
Release Notes: https://linkis.apache.org/download/release-notes-1.1.2
step2 check
step3 Merge ${release_version}-RC branch to master branch (if not merged)
7 Email notification version is released
Please make sure that the Apache Staging repository has been published successfully, usually mail is published 24 hours after this step
Note:
Before sending the ANNOUNCE email. Publishers need to subscribe to announce-subscribe@apache.org. See How to Subscribe to Mailing Lists
You need to wait for some time (about one or two days) after the ANNOUNCE email is sent to the Apache ANNOUNCE mailing list
Send email to dev@linkis.apache.org, announce@apache.org
title:
[ANNOUNCE] Apache Linkis ${release_version} available

content:

Hi all,

Apache Linkis  Team is glad to announce the new release of Apache Linkis ${release_version}.

Apache Linkis builds a computation middleware layer to decouple the upper applications and the underlying data engines, provides standardized interfaces (REST, JDBC, WebSocket etc.) to easily connect to various underlying engines (Spark, Presto, Flink, etc.), while enables cross engine context sharing, unified job& engine governance and orchestration.

Download Links: https://linkis.apache.org/download/main/

Release Notes: https://linkis.apache.org/download/release-${release_version}/

Website: https://linkis.apache.org/

Linkis Resources:
- Issue: https://github.com/apache/linkis/issues
- Mailing list: dev@linkis.apache.org

- Apache Linkis Team
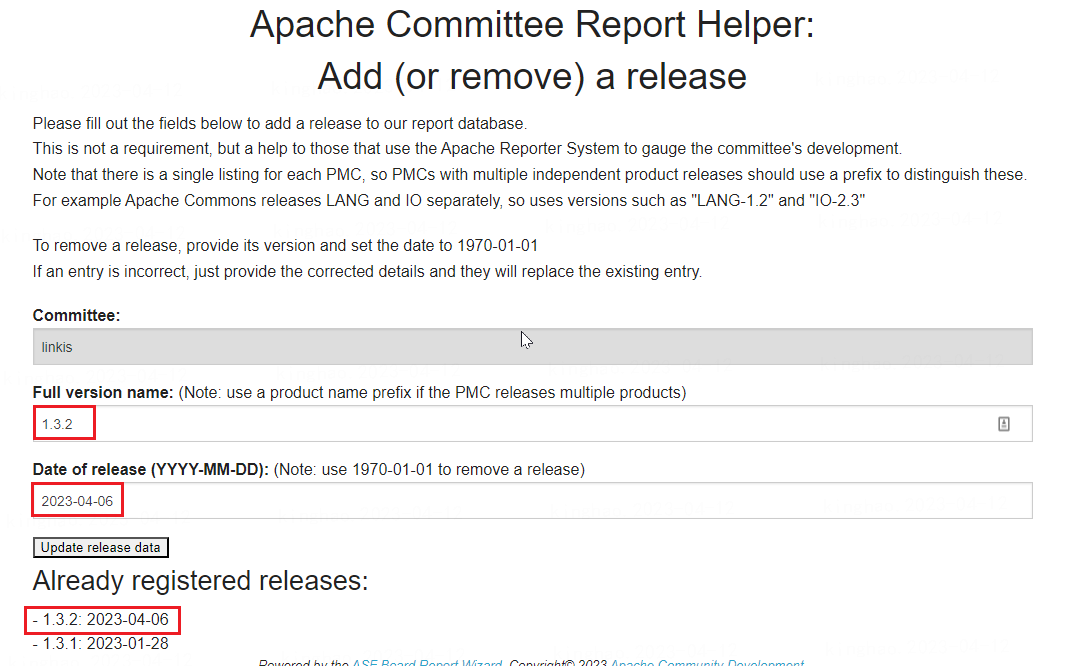
8 Update release information
The Apache Community Health Indicator counts the most recently available releases. Manual updates are currently required after new versions are released.
update address: https://reporter.apache.org/addrelease.html?linkis
Appendix
Appendix one release.sh
Step 2.4-3.3 execute the command, which can be combined in the release.sh script
#!/bin/bash
#
# Licensed to the Apache Software Foundation (ASF) under one or more
# contributor license agreements. See the NOTICE file distributed with
# this work for additional information regarding copyright ownership.
# The ASF licenses this file to You under the Apache License, Version 2.0
# (the "License"); you may not use this file except in compliance with
# the License. You may obtain a copy of the License at
# http://www.apache.org/licenses/LICENSE-2.0
# Unless required by applicable law or agreed to in writing, software
# distributed under the License is distributed on an "AS IS" BASIS,
# WITHOUT WARRANTIES OR CONDITIONS OF ANY KIND, either express or implied.
# See the License for the specific language governing permissions and
# limitations under the License.
#

# tar source code
release_version=1.0.3
#The RC version carried out this time Format RCX
rc_version=RC1
#Corresponding git repository branch
git_branch=release-1.0.3-rc1

workDir=$(cd "$(dirname "$0")"; pwd)
cd ${workDir}; echo "enter work dir:$(pwd)"

rm -rf dist

mkdir -p dist/apache-linkis

#step1 Packaging source files
git archive --format=tar.gz --output="dist/apache-linkis/apache-linkis-$release_version-src.tar.gz"  --prefix=apache-linkis-$release_version-src/   $git_branch
echo  "git archive --format=tar.gz --output='dist/apache-linkis/apache-linkis-$release_version-src.tar.gz' --prefix=apache-linkis-$release_version-src/   $git_branch"

#step2 Copy the binary package
cp linkis-dist/target/apache-linkis-$release_version-bin.tar.gz dist/apache-linkis

#step3 Package the web (if you need to publish the front end)

cd linkis-web
#Installation dependencies
npm install
npm run build
cp apache-linkis-*-web-bin.tar.gz ../dist/apache-linkis

#step4 Signature

### Sign source/binary packages/sha512
cd ../dist/apache-linkis
for i in *.tar.gz; do echo $i; gpg --armor --output $i.asc --detach-sig $i ; done # Calculate signature
for i in *.tar.gz; do echo $i; sha512sum $i > $i.sha512 ; done # Calculate SHA512

### Check if the generated signature/sha512 is correct
for i in *.tar.gz; do echo $i; gpg --verify $i.asc $i ; done
for i in *.tar.gz; do echo $i; sha512sum --check $i.sha512; done


#step5 Upload to svn

cd ../
rm -rf linkis-svn-dev
svn co https://dist.apache.org/repos/dist/dev/linkis linkis-svn-dev


mkdir -p linkis-svn-dev/${release_version}-${rc_version}
cp apache-linkis/*tar.gz* linkis-svn-dev/${release_version}-${rc_version}
cd linkis-svn-dev

# Check svn status
svn status
# Add to svn version
svn add ${release_version}-${rc_version}
svn status
# Submit to svn remote server
svn commit -m "prepare for ${release_version} ${rc_version}"
Mail switch to plain text format
Do not send plain HTML messages; instead, send plain text (content-type: text/plain). Sending HTML reduces the number of people reading your email and is often rejected by the apache.org inbound spam filter. If your message is bounced and the error message says that the spam hit includes HTML_MESSAGE, please resend the message in plain text. For more information, please refer to the official Email Specification https://infra.apache.org/contrib-email-tips
Gmail mailbox switch to plain text format
QQ mailbox switch to plain text format