Quick Deployment
1. Preparing for the first installation
1.1 Linux Server
Hardware requirements Install nearly 10 linkis microservices with at least 3G memory. **The size of the jvm -Xmx memory started by the default configuration of each microservice is 512M (if the memory is not enough, you can try to reduce it to 256/128M, and you can also increase it if the memory is sufficient)
1.2 Add deployment user
Deployment user: the startup user of the linkis core process, and this user will be the administrator privilege by default. The corresponding administrator login password will be generated during the deployment process, located in
conf/linkis-mg-gateway .propertiesfile Linkis supports specifying the user who submits and executes. The linkis main process service will switch to the corresponding user throughsudo -u ${linkis-user}, and then execute the corresponding engine start command, so the user to which the enginelinkis-engineprocess belongs is the executor of the task (so the deployment The user needs to have sudo permissions, and it is password-free)
Take hadoop user as an example:
First check whether there is already a hadoop user in the system. If it already exists, you can directly authorize it; if not, create a user first, and then authorize.
Check if a hadoop user already exists
$ id hadoop
uid=2001(hadoop) gid=2001(hadoop) groups=2001(hadoop)
If it does not exist, you need to create a hadoop user and join the hadoop user group
$ sudo useradd hadoop -g hadoop
$ vi /etc/sudoers
#Secret-free configuration
hadoop ALL=(ALL) NOPASSWD: NOPASSWD: ALL
2. Configuration modification
2.1 Installation package preparation
- Method 1: From the official website download address: https://linkis.apache.org/download/main, download the corresponding The installation package (project installation package and management console installation package)
- Method 2: Compile the project installation package and management console according to Linkis Compile and Package and Front-end Management Console Compile Installation package
After uploading the installation package apache-linkis-x.x.x-incubating-bin.tar.gz, decompress the installation package
$ tar -xvf apache-linkis-x.x.x-incubating-bin.tar.gz
The unzipped directory structure is as follows
-rw-r--r-- 1 hadoop hadoop 531847342 Feb 21 10:10 apache-linkis-1.0.3-incubating-bin.tar.gz
drwxrwxr-x 2 hadoop hadoop 4096 Feb 21 10:13 bin //Script to perform environment check and install
drwxrwxr-x 2 hadoop hadoop 4096 Feb 21 10:13 deploy-config // Environment configuration information such as DB that depends on deployment
-rw-r--r-- 1 hadoop hadoop 1707 Jan 22 2020 DISCLAIMER-WIP
-rw-r--r-- 1 hadoop hadoop 66058 Jan 22 2020 LICENSE
drwxrwxr-x 2 hadoop hadoop 16384 Feb 21 10:13 licenses
drwxrwxr-x 7 hadoop hadoop 4096 Feb 21 10:13 linkis-package // The actual package, including lib/service startup script tool/db initialization script/microservice configuration file, etc.
-rw-r--r-- 1 hadoop hadoop 83126 Jan 22 2020 NOTICE
-rw-r--r-- 1 hadoop hadoop 7900 Jan 22 2020 README_CN.md
-rw-r--r-- 1 hadoop hadoop 8184 Jan 22 2020 README.md
2.2 Configure database information
vim deploy-config/db.sh
# Database information of Linkis' own business
MYSQL_HOST=xx.xx.xx.xx
MYSQL_PORT=3306
MYSQL_DB=linkis_test
MYSQL_USER=test
MYSQL_PASSWORD=xxxxx

# Provide the DB information of the Hive metadata database. If the hive engine is not involved (or just a simple trial), you can not configure it
#Mainly used with scripts, if not configured, it will try to obtain it through the configuration file in $HIVE_CONF_DIR by default
HIVE_META_URL="jdbc:mysql://127.0.0.1:3306/hive_meta_demo?useUnicode=true&characterEncoding=UTF-8"
HIVE_META_USER=demo # User of HiveMeta Metabase
HIVE_META_PASSWORD=demo123 # HiveMeta metabase password
2.3 Configure basic variables
The file is located at deploy-config/linkis-env.sh
deploy user
deployUser=hadoop #The user who executes the deployment is the user created in step 1.2
base directory configuration (optional)
Determine whether you need to adjust according to the actual situation, you can choose to use the default value
# Specify the directory path used by the user, which is generally used to store the user's script files and log files, and is the user's workspace. The corresponding configuration file configuration item is wds.linkis.filesystem.root.path(linkis.properties)
WORKSPACE_USER_ROOT_PATH=file:///tmp/linkis

# File paths such as result set logs, used to store the result set files of the Job wds.linkis.resultSet.store.path(linkis-cg-entrance.properties) //If not configured, use the configuration of HDFS_USER_ROOT_PATH
RESULT_SET_ROOT_PATH=file:///tmp/linkis

# File path such as result set log, used to store the result set file of Job wds.linkis.filesystem.hdfs.root.path(linkis.properties)
HDFS_USER_ROOT_PATH=hdfs:///tmp/linkis

# Store the working path of the execution engine. You need to deploy a local directory with write permissions for the user wds.linkis.engineconn.root.dir(linkis-cg-engineconnmanager.properties)
ENGINECONN_ROOT_PATH=/appcom/tmp
Yarn's ResourceManager address
If you need to use the Spark engine, you need to configure
#You can confirm whether it can be accessed normally by visiting the http://xx.xx.xx.xx:8088/ws/v1/cluster/scheduler interface
YARN_RESTFUL_URL=http://xx.xx.xx.xx:8088
When executing spark tasks, you need to use the ResourceManager of yarn. By default, linkis does not enable permission verification. If the ResourceManager has password permission verification enabled, please install and deploy it.
Modify the database table linkis_cg_rm_external_resource_provider to insert yarn data information. For details, please refer to [Check whether the yarn address is configured correctly] (#811-Check whether the yarn address is configured correctly)
Basic component environment information
It can be configured through the user's system environment variables. If configured through the system environment variables, the deploy-config/linkis-env.sh configuration file can be directly commented out without configuration.
##If you do not use Hive, Spark and other engines and do not rely on Hadoop, you do not need to configure the following environment variables

#HADOOP
HADOOP_HOME=/appcom/Install/hadoop
HADOOP_CONF_DIR=/appcom/config/hadoop-config

#Hive
HIVE_HOME=/appcom/Install/hive
HIVE_CONF_DIR=/appcom/config/hive-config

#Spark
SPARK_HOME=/appcom/Install/spark
SPARK_CONF_DIR=/appcom/config/spark-config
LDAP login configuration (optional)
The default is to use a static user and password. The static user is the deployment user. The static password will generate a random password string during deployment and store it in ${LINKIS_HOME}/conf/linkis-mg-gateway.properties(>=1.0.3 Version)
#LDAP configuration, Linkis only supports deployment user login by default. If you need to support multi-user login, you can use LDAP. You need to configure the following parameters:
#LDAP_URL=ldap://localhost:1389/
#LDAP_BASEDN=dc=webank,dc=com
JVM memory configuration (optional)
The microservice starts the jvm memory configuration, which can be adjusted according to the actual situation of the machine. If the machine memory resources are few, you can try to adjust it to 256/128M
## java application default jvm memory
export SERVER_HEAP_SIZE="512M"
Installation directory configuration (optional)
Linkis will eventually be installed in this directory. If it is not configured, it will be in the same level directory as the current installation package by default.
##The decompression directory and the installation directory need to be inconsistent
LINKIS_HOME=/appcom/Install/LinkisInstall
Data source service is enabled (optional)
According to the actual situation, if you want to use the data source function, you need to adjust
#If you want to start metadata related microservices, you can set this export ENABLE_METADATA_MANAGE=true
export ENABLE_METADATA_QUERY=true
No HDFS mode deployment (optional >1.1.2 version support hold)
Deploy Linkis services in an environment without HDFS to facilitate more lightweight learning and debugging. Deploying in HDFS mode does not support tasks such as hive/spark/flink engines
Modify the linkis-env.sh file and modify the following
#Use the [file://] path pattern instead of the [hdfs://] pattern
WORKSPACE_USER_ROOT_PATH=file:///tmp/linkis/
HDFS_USER_ROOT_PATH=file:///tmp/linkis
RESULT_SET_ROOT_PATH=file:///tmp/linkis

export ENABLE_HDFS=false
export ENABLE_HIVE=false
export ENABLE_SPARK=false
3. Install and start
3.1 Execute the installation script:
sh bin/install.sh
The install.sh script will ask you if you need to initialize the database and import metadata. If you choose to initialize, the table data in the database will be emptied and reinitialized.
Empty database must be selected for the first installation
- If an error occurs, and it is unclear what command to execute to report the error, you can add the -x parameter
sh -x bin/install.shto print out the shell script execution process log, which is convenient for locating the problem - Permission problem:
mkdir: cannot create directory 'xxxx': Permission denied, please confirm whether the deployment user has read and write permissions for the path
The prompt for successful execution is as follows:
`Congratulations! You have installed Linkis 1.0.3 successfully, please use sh /data/Install/linkis/sbin/linkis-start-all.sh to start it!
Your default account password is [hadoop/5e8e312b4]`
3.2 Add mysql driver package
Because the mysql-connector-java driver is under the GPL2.0 protocol, it does not meet the license policy of the Apache open source protocol. Therefore, starting from version 1.0.3, the official deployment package of the Apache version provided by default is no mysql-connector-java-x.x.x.jar (If it is installed through the integrated family bucket material package, you do not need to add it manually), you need to add dependencies to the corresponding lib package by yourself during installation and deployment. You can check whether it exists in the corresponding directory, if not, you need to add
To download the mysql driver, take version 5.1.49 as an example: download link
Copy the mysql driver package to the lib package
cp mysql-connector-java-5.1.49.jar ${LINKIS_HOME}/lib/linkis-spring-cloud-services/linkis-mg-gateway/
cp mysql-connector-java-5.1.49.jar ${LINKIS_HOME}/lib/linkis-commons/public-module/
3.3 Configuration Adjustment (Optional)
The following operations are related to the dependent environment. According to the actual situation, determine whether the operation is required
3.3.1 kerberos authentication
If the hive cluster used has kerberos mode authentication enabled, modify the configuration ${LINKIS_HOME}/conf/linkis.properties (<=1.1.3) file
#Append the following configuration
echo "wds.linkis.keytab.enable=true" >> linkis.properties
3.3.2 Yarn Authentication
When executing spark tasks, you need to use the ResourceManager of yarn, which is controlled by the configuration item YARN_RESTFUL_URL=http://xx.xx.xx.xx:8088 .
During installation and deployment, the YARN_RESTFUL_URL=http://xx.xx.xx.xx:8088 information will be updated to the database table linkis_cg_rm_external_resource_provider. By default, access to yarn resources does not require permission verification.
If password authentication is enabled in yarn's ResourceManager, please modify the yarn data information generated in the database table linkis_cg_rm_external_resource_provider after installation and deployment.
For details, please refer to [Check whether the yarn address is configured correctly] (#811-Check whether the yarn address is configured correctly)
3.3.3 session
If you are upgrading to Linkis. Deploy DSS or other projects at the same time, but the dependent linkis version introduced in other software is <1.1.1 (mainly in the lib package, the linkis-module-x.x.x.jar package of the dependent Linkis is <1.1.1), you need to modify the linkis located in ${LINKIS_HOME}/conf/linkis.properties file
echo "wds.linkis.session.ticket.key=bdp-user-ticket-id" >> linkis.properties
3.4 Start the service
sh sbin/linkis-start-all.sh
3.5 Modification of post-installation configuration
After the installation is complete, if you need to modify the configuration (because of port conflicts or some configuration problems, you need to adjust the configuration), you can re-execute the installation, or modify the configuration ${LINKIS_HOME}/conf/*properties file of the corresponding service, Restart the corresponding service, such as: sh sbin/linkis-daemon.sh start ps-publicservice
3.6 Check whether the service starts normally
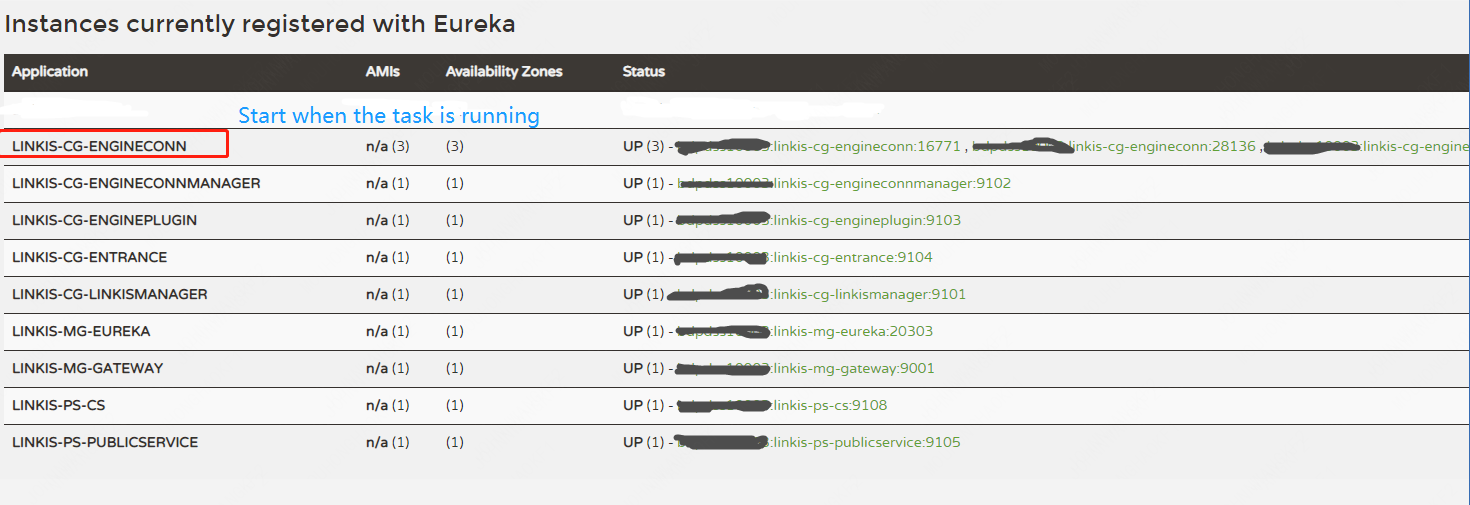
Visit the eureka service page (http://eurekaip:20303),
The 1.x.x version will start 8 Linkis microservices by default, and the linkis-cg-engineconn service in the figure below will be started only for running tasks
LINKIS-CG-ENGINECONNMANAGER Engine Management Services
LINKIS-CG-ENGINEPLUGIN Engine Plugin Management Service
LINKIS-CG-ENTRANCE Computing Governance Entry Service
LINKIS-CG-LINKISMANAGER Computing Governance Management Service
LINKIS-MG-EUREKA Microservice registry service
LINKIS-MG-GATEWAY gateway service
LINKIS-PS-CS context service
LINKIS-PS-PUBLICSERVICE Public Service
If the data source service function is enabled (not enabled by default), you will see these two services
LINKIS-PS-DATA-SOURCE-MANAGER
LINKIS-PS-METADATAMANAGER
If any services are not started, you can view detailed exception logs in the corresponding log/${service name}.log file.
4. Install the web frontend
The web side uses nginx as the static resource server, and the access request process is:
Linkis console request->nginx ip:port->linkis-gateway ip:port->other services
4.1 Download the front-end installation package and unzip it
tar -xvf apache-linkis-x.x.x-incubating-web-bin.tar.gz
4.2 Modify the configuration config.sh
#Access the port of the console
linkis_port="8188"

#linkis-mg-gatewayService Address
linkis_url="http://localhost:9020"
4.3 Execute the deployment script
# nginx requires sudo privileges to install
sudo sh install.sh
After installation, linkis' nginx configuration file is by default in /etc/nginx/conf.d/linkis.conf
nginx log files are in /var/log/nginx/access.log and /var/log/nginx/error.log
An example of the nginx configuration file of the generated linkis console is as follows:
        server {
            listen 8188;# access port If the port is occupied, it needs to be modified
            server_name localhost;
            #charset koi8-r;
            #access_log /var/log/nginx/host.access.log main;
            location / {
            root /appcom/Install/linkis-web/dist; # static file directory
            index index.html index.html;
            }
            location /ws {
            proxy_pass http://localhost:9020;#Address of backend Linkis
            proxy_http_version 1.1;
            proxy_set_header Upgrade $http_upgrade;
            proxy_set_header Connection upgrade;
            }

            location /api {
            proxy_pass http://localhost:9020; #Address of backend Linkis
            proxy_set_header Host $host;
            proxy_set_header X-Real-IP $remote_addr;
            proxy_set_header x_real_ipP $remote_addr;
            proxy_set_header remote_addr $remote_addr;
            proxy_set_header X-Forwarded-For $proxy_add_x_forwarded_for;
            proxy_http_version 1.1;
            proxy_connect_timeout 4s;
            proxy_read_timeout 600s;
            proxy_send_timeout 12s;
            proxy_set_header Upgrade $http_upgrade;
            proxy_set_header Connection upgrade;
            }

            #error_page 404 /404.html;
            # redirect server error pages to the static page /50x.html
            #
            error_page 500 502 503 504 /50x.html;
            location = /50x.html {
            root /usr/share/nginx/html;
            }
        }
If you need to modify the port or static resource directory, etc., please modify the /etc/nginx/conf.d/linkis.conf file and execute the sudo nginx -s reload command
- At present, the visualis function is not integrated. During the installation process, if you are prompted that the installation of linkis/visualis fails, you can ignore it
- Check whether nginx starts normally: check whether the nginx process exists
ps -ef |grep nginx - Check if nginx is configured correctly
sudo nginx -T - If the port is occupied, you can modify the service port
/etc/nginx/conf.d/linkis.conflisten port value started by nginx, save it and restart it - If interface 502 appears in the access management console, or
Unexpected token < in JSON at position 0is abnormal, please confirm whether linkis-mg-gateway starts normally. If it starts normally, check the linkis-mg-gateway configured in the nginx configuration file Is the service address correct?
4.4 Login to the console
Browser login http://xx.xx.xx.xx:8188/#/login
Username/password can be found in ${LINKIS_HOME}/conf/linkis-mg-gateway.properties
wds.linkis.admin.user= #User
wds.linkis.admin.password= #Password
Refer to the User Manual for the usage guide of the console
5. Verify basic functionality
Verify the corresponding engine tasks according to actual needs
#The version number of the engineType of the engine must match the actual version. The following example is the default version number
#shell engine tasks
sh bin/linkis-cli -submitUser hadoop -engineType shell-1 -codeType shell -code "whoami"

#hive engine tasks
sh bin/linkis-cli -submitUser hadoop -engineType hive-2.3.3 -codeType hql -code "show tables"

#spark engine tasks
sh bin/linkis-cli -submitUser hadoop -engineType spark-2.4.3 -codeType sql -code "show tables"

#python engine task
sh bin/linkis-cli -submitUser hadoop -engineType python-python2 -codeType python -code 'print("hello, world!")'
If the verification fails, please refer to [Step 6] for troubleshooting
6 Installation of development tool IDE (Scriptis) (optional)
After installing the Scripti tool, it can support writing SQL, Pyspark, HiveQL and other scripts online on the web page
For detailed instructions, see Installation and Deployment of Tool Scriptis
7. Supported Engines
7.1 Engine Adaptation List
Please note: The separate installation package of Linkis only contains four engines by default: Python/Shell/Hive/Spark. If there are other engines (such as jdbc/flink/sqoop and other engines) usage scenarios, you can install them manually. For details, please refer to EngineConnPlugin Engine Plugin Installation Documentation.
The list of supported engines that have been adapted in this version is as follows:
| Engine type | Adaptation | Does the official installation package contain |
|---|---|---|
| Python | >=1.0.0 Adapted | Included |
| Shell | >=1.0.0 Adapted | Included |
| Hive | >=1.0.0 Adapted | Included |
| Spark | >=1.0.0 Adapted | Included |
| Pipeline | >=1.0.0 Adapted | Excludes |
| JDBC | >=1.0.0 Adapted | Excludes |
| Flink | >=1.0.0 already adapted | Not included |
| openLooKeng | >=1.1.1 has been adapted | Not included |
| Sqoop | >=1.1.2 Adapted | Excludes |
7.2 View the deployed engine
Method 1: View the engine lib package directory
$ tree linkis-package/lib/linkis-engineconn-plugins/ -L 3
linkis-package/lib/linkis-engineconn-plugins/
├── hive
│ ├── dist
│ │ └── v2.3.3 #version is 2.3.3 engineType is hive-2.3.3
│ └── plugin
│ └── 2.3.3
├── python
│ ├── dist
│ │ └── vpython2
│ └── plugin
│ └── python2 #version is python2 engineType is python-python2
├── shell
│ ├── dist
│ │ └── v1
│ └── plugin
│ └── 1
└── spark
    ├── dist
    │ └── v2.4.3
    └── plugin
        └── 2.4.3
Method 2: View the database table of linkis
select * from linkis_cg_engine_conn_plugin_bml_resources
8. Troubleshooting Guidelines for Common Abnormal Problems
8.1. Yarn Queue Check
If you need to use spark/hive/flink engine
After logging in, check whether the yarn queue resources can be displayed normally (click the button in the lower right corner of the page) (the front end needs to be installed first)
Normally as shown below:

If it cannot be displayed: You can adjust it according to the following guidelines
8.1.1 Check whether the yarn address is configured correctly
Database table linkis_cg_rm_external_resource_provider `
Insert yarn data information
INSERT INTO `linkis_cg_rm_external_resource_provider`
(`resource_type`, `name`, `labels`, `config`) VALUES
('Yarn', 'default', NULL,
'{\r\n"rmWebAddress": "http://xx.xx.xx.xx:8088",\r\n"hadoopVersion": "2.7.2",\r\n"authorEnable":false, \r\n"user":"hadoop",\r\n"pwd":"123456"\r\n}'
);

config field properties

"rmWebAddress": "http://xx.xx.xx.xx:8088", #need to bring http and port
"hadoopVersion": "2.7.2",
"authorEnable":true, //Whether authentication is required You can verify the username and password by visiting http://xx.xx.xx.xx:8088 in the browser
"user":"user",//username
"pwd":"pwd"//Password
After the update, because the cache is used in the program, if you want to take effect immediately, you need to restart the linkis-cg-linkismanager service
sh sbin/linkis-daemon.sh restart cg-linkismanager
8.1.2 Check whether the yarn queue exists
Exception information: desc: queue ide is not exists in YARN. indicates that the configured yarn queue does not exist and needs to be adjusted
Modification method: linkis management console/parameter configuration> global settings>yarn queue name [wds.linkis.rm.yarnqueue], modify a yarn queue that can be used, and the yarn queue to be used can be found at rmWebAddress:http:// xx.xx.xx.xx:8088/cluster/scheduler
View available yarn queues
- View yarn queue address: http://ip:8888/cluster/scheduler
8.2 Check whether the engine material resource is uploaded successfully
#Login to the linkis database
select * from linkis_cg_engine_conn_plugin_bml_resources
The normal is as follows:

Check whether the material record of the engine exists (if there is an update, check whether the update time is correct).
- If it does not exist or is not updated, first try to manually refresh the material resource (for details, see [Engine Material Resource Refresh](engine-conn-plugin-installation#23-Engine Refresh)).
- Check the specific reasons for material failure through
log/linkis-cg-engineplugin.loglog. In many cases, it may be caused by the lack of permissions in the hdfs directory - Check whether the gateway address configuration is correct. The configuration item
wds.linkis.gateway.urlofconf/linkis.properties
The material resources of the engine are uploaded to the hdfs directory by default as /apps-data/${deployUser}/bml
hdfs dfs -ls /apps-data/hadoop/bml
#If there is no such directory, please manually create the directory and grant ${deployUser} read and write permissions
hdfs dfs -mkdir /apps-data
hdfs dfs -chown hadoop:hadoop/apps-data
8.3 Login password problem
By default, linkis uses a static user and password. The static user is the deployment user. The static password will randomly generate a password string during deployment and store it in
${LINKIS_HOME}/conf/linkis-mg-gateway.properties (>=1.0.3 version)
8.4 version compatibility issues
The engine supported by linkis by default, the compatibility with dss can be viewed this document
8.5 How to locate the server exception log
Linkis has many microservices. If you are unfamiliar with the system, sometimes you cannot locate the specific module that has an exception. You can search through the global log.
tail -f log/* |grep -5n exception (or tail -f log/* |grep -5n ERROR)
less log/* |grep -5n exception (or less log/* |grep -5n ERROR)
8.6 Exception troubleshooting of execution engine tasks
step1: Find the startup deployment directory of the engine
- Method 1: If it is displayed in the execution log, you can view it on the management console as shown below:

- Method 2: If it is not found in method 1, you can find the parameter
wds.linkis.engineconn.root.dirconfigured inconf/linkis-cg-engineconnmanager.properties, which is the directory where the engine is started and deployed. Subdirectories are segregated by the user executing the engine
# If you don't know the taskid, you can select it after sorting by time ll -rt /appcom/tmp/${executed user}/${date}/${engine}/
cd /appcom/tmp/${executed user}/${date}/${engine}/${taskId}
The directory is roughly as follows
conf -> /appcom/tmp/engineConnPublickDir/6a09d5fb-81dd-41af-a58b-9cb5d5d81b5a/v000002/conf #engine configuration file
engineConnExec.sh #Generated engine startup script
lib -> /appcom/tmp/engineConnPublickDir/45bf0e6b-0fa5-47da-9532-c2a9f3ec764d/v000003/lib #Engine dependent packages
logs #Engine startup and execution related logs
step2: View the log of the engine
less logs/stdout
step3: try to execute the script manually (if needed) Debugging can be done by trying to execute the script manually
sh -x engineConnExec.sh
8.7 How to modify the port of the registry eureka
Sometimes when the eureka port is occupied by other services and the default eureka port cannot be used, the eureka port needs to be modified. Here, the modification of the eureka port is divided into two situations: before the installation is performed and after the installation is performed.
- Modify the eureka port of the registry before performing the installation
1. Enter the decompression directory of apache-linkis-x.x.x-incubating-bin.tar.gz
2. Execute vi deploy-config/linkis-env.sh
3. Modify EUREKA_PORT=20303 to EUREKA_PORT=port number
- Modify the eureka port of the registry after the installation is performed
1. Go to the ${LINKIS_HOME}/conf directory

2. Execute grep -r 20303 ./* , the query result is as follows:
      ./application-eureka.yml: port: 20303
      ./application-eureka.yml: defaultZone: http://ip:20303/eureka/
      ./application-linkis.yml: defaultZone: http://ip:20303/eureka/
      ./linkis-env.sh:EUREKA_PORT=20303
      ./linkis.properties:wds.linkis.eureka.defaultZone=http://ip:20303/eureka/

3. Change the port in the corresponding location to the new port, and restart all services sh restart sbin/linkis-start-all.sh
8.8 Notes on CDH adaptation version
CDH itself is not the official standard hive/spark package used. When adapting, it is best to modify the hive/spark version dependencies in the source code of linkis to recompile and deploy. For details, please refer to the CDH adaptation blog post [Linkis1.0 - Installation and Stepping in the CDH5 Environment] [DSS1.0.0+Linkis1.0.2——Trial record in CDH5 environment] [DSS1.0.0 and Linkis1.0.2——Summary of JDBC engine related issues] [DSS1.0.0 and Linkis1.0.2——Summary of Flink engine related issues]
8.9 Debugging of Http interface
- Method 1 can enable [Login-Free Mode Guide] (/docs/latest/api/login-api/#2 Login-Free Configuration)
- In method 2 postman, the request header brings the cookie value of the successful login
The cookie value can be obtained after successful login on the browser side

Cookie: bdp-user-ticket-id=xxxxxxxxxxxxxxxxxxxxxxxxxxxxxx
- Method 3 Add a static Token to the http request header Token is configured in conf/token.properties Such as: TEST-AUTH=hadoop,root,user01
Token-Code: TEST-AUTH
Token-User:hadoop
8.10 Troubleshooting process for abnormal problems
First, follow the above steps to check whether the service/environment, etc. are all started normally
Troubleshoot basic problems according to some of the scenarios listed above
QA documentation Find out if there is a solution, link: https://docs.qq.com/doc/DSGZhdnpMV3lTUUxq
See if you can find a solution by searching the content in the issue
 Through the official website document search, for some problems, you can search for keywords through the official website, such as searching for "deployment". (If 404 appears, please refresh your browser)

9. How to obtain relevant information
Linkis official website documents are constantly improving, you can view/keyword search related documents on this official website. Related blog post links
- Linkis technical blog collection https://github.com/apache/linkis/issues/1233
- Technical blog post on the official account https://mp.weixin.qq.com/mp/homepage?__biz=MzI4MDkxNzUxMg==&hid=1&sn=088cbf2bbed1c80d003c5865bc92ace8&scene=18
- Official website documentation https://linkis.apache.org/docs/latest/about/introduction
- bili technology sharing video https://space.bilibili.com/598542776?spm_id_from=333.788.b_765f7570696e666f.2