Flink engine usage documentation
This article mainly introduces the installation, use and configuration of the flink engine plugin in Linkis.
1. Preliminary work
1.1 Engine environment configuration
If you want to use the Flink engine on your server, you need to ensure that the following environment variables are set correctly and that the user who started the engine has these environment variables.
1.2 Engine Verification
It is strongly recommended that you check these environment variables for the executing user before executing flink tasks. The specific way is
sudo su -${username}
echo ${JAVA_HOME}
echo ${FLINK_HOME}
| Environment variable name | Environment variable content | Remarks |
|---|---|---|
| JAVA_HOME | JDK installation path | Required |
| HADOOP_HOME | Hadoop installation path | Required |
| HADOOP_CONF_DIR | Hadoop configuration path | Linkis starts the Flink on yarn mode adopted by the Flink engine, so yarn support is required. |
| FLINK_HOME | Flink installation path | Required |
| FLINK_CONF_DIR | Flink configuration path | Required, such as ${FLINK_HOME}/conf |
| FLINK_LIB_DIR | Flink package path | Required, ${FLINK_HOME}/lib |
2. Engine plugin installation
2.1 Engine plugin preparation (choose one) non-default engine
Method 1: Download the engine plug-in package directly
Method 2: Compile the engine plug-in separately (requires a maven environment)
# compile
cd ${linkis_code_dir}/linkis-engineconn-plugins/flink/
mvn clean install
# The compiled engine plug-in package is located in the following directory
${linkis_code_dir}/linkis-engineconn-plugins/flink/target/out/
EngineConnPlugin engine plugin installation
2.2 Upload and load engine plugins
Upload the engine plug-in package in 2.1 to the engine directory of the server
${LINKIS_HOME}/lib/linkis-engineplugins
The directory structure after uploading is as follows
linkis-engineconn-plugins/
├── big
│   ├── dist
│ │ └── 1.12.2
│   │       ├── conf
│ │ └── lib
│   └── plugin
│ └── 1.12.2
2.3 Engine refresh
2.3.1 Restart and refresh
Refresh the engine by restarting the linkis-cg-linkismanager service
cd ${LINKIS_HOME}/sbin
sh linkis-daemon.sh restart cg-linkismanager
2.3.2 Check if the engine is refreshed successfully
You can check whether the last_update_time of this table in the linkis_engine_conn_plugin_bml_resources in the database is the time when the refresh is triggered.
#Login to the linkis database
select * from linkis_cg_engine_conn_plugin_bml_resources;
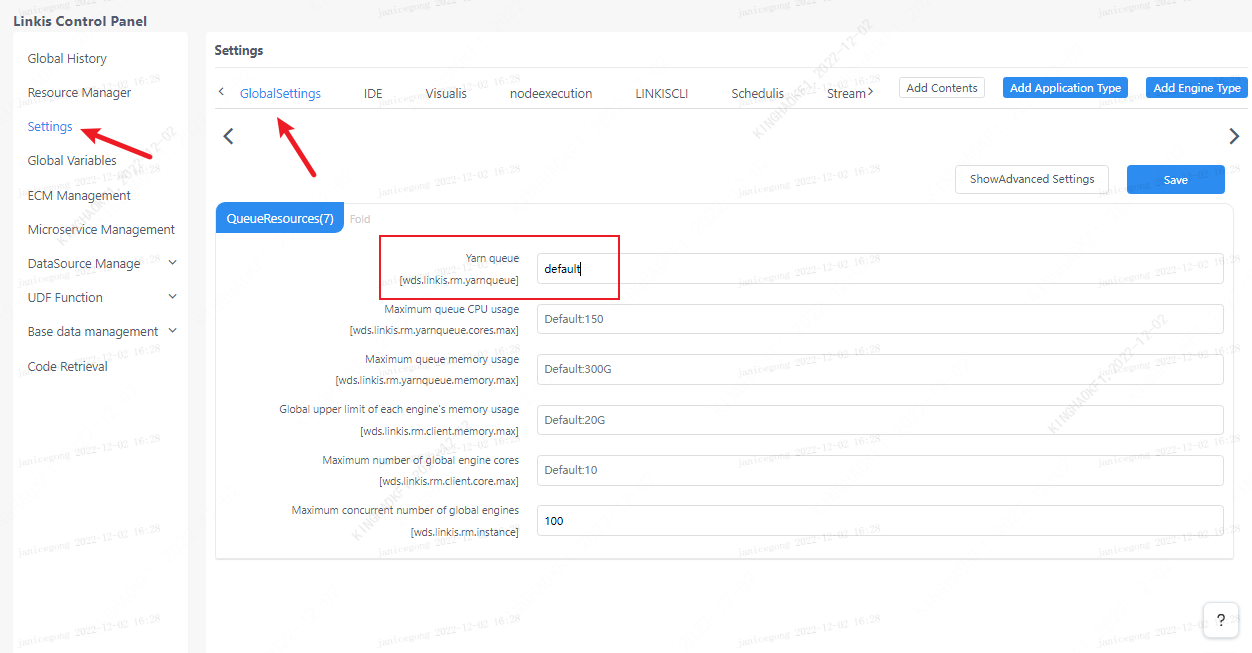
3. Use of Flink engine
The Flink engine of Linkis is started by flink on yarn, so the queue used by the user needs to be specified, as shown in the figure below.
3.1 Submit tasks through Linkis-cli
sh ./bin/linkis-cli -engineType flink-1.12.2 \
-codeType sql -code "show tables"  \
-submitUser hadoop -proxyUser hadoop
More Linkis-Cli command parameter reference: Linkis-Cli usage
3.2 Submitting tasks via ComputationEngineConn
FlinkSQL can support a variety of data sources, such as binlog, kafka, hive, etc. If you want to use these data sources in Flink code, you need to put these connector plugin jar packages into In the lib of the flink engine, and restart the EnginePlugin service of Linkis. If you want to use binlog as a data source in your FlinkSQL, then you need to place flink-connector-mysql-cdc-1.1.1.jar in the lib of the flink engine.
In order to facilitate sampling and debugging, we have added the fql script type in Scriptis, which is specially used to execute FlinkSQL. But you need to ensure that your DSS has been upgraded to DSS1.0.0. After upgrading to DSS1.0.0, you can directly enter Scriptis to create a new fql script for editing and execution.
Writing example of FlinkSQL, taking binlog as an example
CREATE TABLE mysql_binlog (
 id INT NOT NULL,
 name STRING,
 age INT
) WITH (
 'connector' = 'mysql-cdc',
 'hostname' = 'ip',
 'port' = 'port',
 'username' = 'username',
 'password' = 'password',
 'database-name' = 'dbname',
 'table-name' = 'tablename',
 'debezium.snapshot.locking.mode' = 'none' -- it is recommended to add, otherwise the lock table will be required
);
select * from mysql_binlog where id > 10;
When debugging using the select syntax in Scriptis, the Flink engine will have an automatic cancel mechanism, that is, when the specified time or the number of lines sampled reaches the specified number, the Flink engine will Actively cancel the task and persist the obtained result set, and then the front end will call the interface to open the result set to display the result set on the front end.
3.3 Submitting tasks via OnceEngineConn
OnceEngineConn is used to officially start Flink streaming applications, specifically by calling LinkisManager createEngineConn interface through LinkisManagerClient, and sending the code to the created Flink engine, and then The Flink engine starts to execute, and this method can be called by other systems, such as Streamis. The usage of Client is also very simple, first create a maven project, or introduce the following dependencies in your project.
<dependency>
    <groupId>org.apache.linkis</groupId>
    <artifactId>linkis-computation-client</artifactId>
    <version>${linkis.version}</version>
</dependency>
Then create a scala test file, click execute, and the parsing from a binlog data is completed and inserted into a table in another mysql database. But it should be noted that you must create a resources directory in the maven project, place a linkis.properties file, and specify the gateway address and api version of linkis, such as
wds.linkis.server.version=v1
wds.linkis.gateway.url=http://ip:9001/
object OnceJobTest {
  def main(args: Array[String]): Unit = {
    val sql = """CREATE TABLE mysql_binlog (
                | id INT NOT NULL,
                | name STRING,
                | age INT
                |) WITH (
                | 'connector' = 'mysql-cdc',
                | 'hostname' = 'ip',
                | 'port' = 'port',
                | 'username' = '${username}',
                | 'password' = '${password}',
                | 'database-name' = '${database}',
                | 'table-name' = '${tablename}',
                | 'debezium.snapshot.locking.mode' = 'none'
                |);
                |CREATE TABLE sink_table (
                | id INT NOT NULL,
                | name STRING,
                | age INT,
                | primary key(id) not enforced
                |) WITH (
                |  'connector' = 'jdbc',
                |  'url' = 'jdbc:mysql://${ip}:port/${database}',
                |  'table-name' = '${tablename}',
                |  'driver' = 'com.mysql.jdbc.Driver',
                |  'username' = '${username}',
                |  'password' = '${password}'
                |);
                |INSERT INTO sink_table SELECT id, name, age FROM mysql_binlog;
                |""".stripMargin
    val onceJob = SimpleOnceJob.builder().setCreateService("Flink-Test").addLabel(LabelKeyUtils.ENGINE_TYPE_LABEL_KEY, "flink-1.12.2")
      .addLabel(LabelKeyUtils.USER_CREATOR_LABEL_KEY, "hadoop-Streamis").addLabel(LabelKeyUtils.ENGINE_CONN_MODE_LABEL_KEY, "once")
      .addStartupParam(Configuration.IS_TEST_MODE.key, true)
      //    .addStartupParam("label." + LabelKeyConstant.CODE_TYPE_KEY, "sql")
      .setMaxSubmitTime(300000)
      .addExecuteUser("hadoop").addJobContent("runType", "sql").addJobContent("code", sql).addSource("jobName", "OnceJobTest")
      .build()
    onceJob.submit()
    println(onceJob.getId)
    onceJob.waitForCompleted()
    System.exit(0)
  }
}