Quickly Implement New Engine
1. Linkis new engine function code implementation
Implementing a new engine is actually implementing a new EngineConnPlugin (ECP) engine plugin. Specific steps are as follows:
1.1 Create a new maven module and introduce the maven dependency of ECP
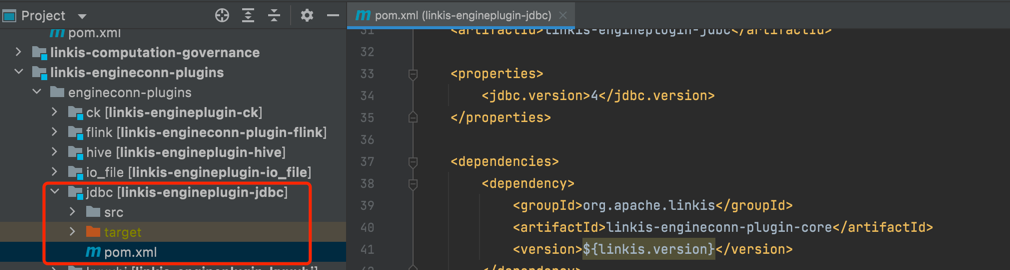
<dependency>
    <groupId>org.apache.linkis</groupId>
    <artifactId>linkis-engineconn-plugin-core</artifactId>
    <version>${linkis.version}</version>
</dependency>
<!-- and some other required maven configurations -->
1.2 Implement the main interface of ECP
EngineConnPlugin: When starting EngineConn, first find the corresponding EngineConnPlugin class, and use this as the entry point to obtain the implementation of other core interfaces, which is the main interface that must be implemented.
EngineConnFactory: Implementing the logic of how to start an engine connector and how to start an engine executor is an interface that must be implemented.
- Implement the createEngineConn method: return an EngineConn object, where getEngine returns an object that encapsulates the connection information with the underlying engine, and also contains the Engine type information.
- For engines that only support a single computing scenario, inherit SingleExecutorEngineConnFactory, implement createExecutor, and return the corresponding Executor.
- For engines that support multi-computing scenarios, you need to inherit MultiExecutorEngineConnFactory and implement an ExecutorFactory for each computation type. EngineConnPlugin will obtain all ExecutorFactory through reflection, and return the corresponding Executor according to the actual situation.
EngineConnResourceFactory: It is used to limit the resources required to start an engine. Before the engine starts, it will apply for resources from Linkis Manager based on this. Not required, GenericEngineResourceFactory can be used by default.
EngineLaunchBuilder: It is used to encapsulate the necessary information that EngineConnManager can parse into startup commands. Not required, you can directly inherit JavaProcessEngineConnLaunchBuilder.
1.3 Implement the engine Executor executor logic
Executor is an executor. As a real computing scene executor, it is an actual computing logic execution unit and an abstraction of various specific capabilities of the engine. It provides various services such as locking, accessing status, and obtaining logs. And according to the actual needs, Linkis provides the following derived Executor base classes by default. The class names and main functions are as follows:
- SensibleExecutor:
- Executor has multiple states, allowing Executor to switch states
- After the Executor switches states, operations such as notifications are allowed
- YarnExecutor: Refers to the Yarn type engine, which can obtain applicationId, applicationURL and queue.
- ResourceExecutor: means that the engine has the ability to dynamically change resources, and provides the requestExpectedResource method, which is used to apply for a new resource from the RM every time you want to change the resource; and the resourceUpdate method, which is used each time the engine actually uses the resource When changes occur, report the resource situation to RM.
- AccessibleExecutor: is a very important Executor base class. If the user's Executor inherits this base class, it means that the Engine can be accessed. Here, it is necessary to distinguish between the state() of SensibleExecutor and the getEngineStatus() method of AccessibleExecutor: state() is used to obtain the engine status, and getEngineStatus() will obtain the Metric data of basic indicators such as the status, load, and concurrency of the engine.
- At the same time, if AccessibleExecutor is inherited, the Engine process will be triggered to instantiate multiple EngineReceiver methods. EngineReceiver is used to process RPC requests from Entrance, EM and LinkisMaster, making the engine an accessible engine. If users have special RPC requirements, they can communicate with AccessibleExecutor by implementing the RPCService interface.
- ExecutableExecutor: is a resident Executor base class. The resident Executor includes: Streaming application in the production center, steps specified to run in independent mode after being submitted to Schedulelis, business applications for business users, etc.
- StreamingExecutor: Streaming is a streaming application, inherited from ExecutableExecutor, and needs to have the ability to diagnose, do checkpoint, collect job information, and monitor alarms.
- ComputationExecutor: is a commonly used interactive engine Executor, which handles interactive execution tasks and has interactive capabilities such as status query and task kill.
- ConcurrentComputationExecutor: User concurrent engine Executor, commonly used in JDBC type engines. When executing scripts, the administrator account starts the engine instance, and all users share the engine instance.
2. Take the JDBC engine as an example to explain the implementation steps of the new engine in detail
This chapter takes the JDBC engine as an example to explain the implementation process of the new engine in detail, including engine code compilation, installation, database configuration, management console engine label adaptation, and the new engine script type extension in Scripts and the task node extension of the new workflow engine, etc. .
2.1 Concurrency engine setting default startup user
The abstract class inherited from the core class JDBCEngineConnExecutor in the JDBC engine is ConcurrentComputationExecutor, and the abstract class inherited from the core class XXXEngineConnExecutor in the calculation engine is ComputationExecutor. This leads to the biggest difference between the two: the JDBC engine instance is started by the administrator user and shared by all users to improve the utilization of machine resources; while the script of the computing engine type is submitted, an engine instance will be started under each user. , the engine instances between users are isolated from each other. This will not be elaborated here, because whether it is a concurrent engine or a computing engine, the additional modification process mentioned below should be consistent.
Correspondingly, if your new engine is a concurrent engine, then you need to pay attention to this class: AMConfiguration.scala, if your new engine is a computing engine, you can ignore it.
object AMConfiguration {
  // If your engine is a multi-user concurrent engine, then this configuration item needs to be paid attention to
  val MULTI_USER_ENGINE_TYPES = CommonVars("wds.linkis.multi.user.engine.types", "jdbc,ck,es,io_file,appconn")

    private def getDefaultMultiEngineUser(): String = {
    // This should be to set the startup user when the concurrent engine is pulled up. The default jvmUser is the startup user of the engine service Java process.
    val jvmUser = Utils.getJvmUser
    s"""{jdbc:"$jvmUser", presto: "$jvmUser" es: "$jvmUser", ck:"$jvmUser", appconn:"$jvmUser", io_file:"root"}"""
  }
}
2.2 New engine type extension
In the class JDBCEngineConnFactory that implements the ComputationSingleExecutorEngineConnFactory interface, the following two methods need to be implemented:
override protected def getEngineConnType: EngineType = EngineType.JDBC

override protected def getRunType: RunType = RunType.JDBC
Therefore, it is necessary to add variables corresponding to JDBC in EngineType and RunType.
// EngineType.scala is similar to the variable definition of the existing engine, adding JDBC related variables or code
object EngineType extends Enumeration with Logging {
  val JDBC = Value("jdbc")
}

def mapStringToEngineType(str: String): EngineType = str match {
  case _ if JDBC.toString.equalsIgnoreCase(str) => JDBC
}

// RunType.scla中
object RunType extends Enumeration {
    val JDBC = Value("jdbc")
}
2.3 Version number settings in the JDBC engine tab
// Add the version configuration of JDBC in LabelCommonConfig
public class LabelCommonConfig {
   public final static CommonVars<String> JDBC_ENGINE_VERSION = CommonVars.apply("wds.linkis.jdbc.engine.version", "4");
}

// Supplement the matching logic of jdbc in the init method of EngineTypeLabelCreator
// If this step is not done, when the code is submitted to the engine, the version number will be missing from the engine tag information
public class EngineTypeLabelCreator {
private static void init() {
     defaultVersion.put(EngineType.JDBC().toString(), LabelCommonConfig.JDBC_ENGINE_VERSION.getValue());
   }
}
2.4 Types of script files that are allowed to be opened by the script editor
Follow configuration items:wds.linkis.storage.file.type
object LinkisStorageConf{
  val FILE_TYPE = CommonVars("wds.linkis.storage.file.type", "dolphin,sql,scala,py,hql,python,out,log,text,sh,jdbc,ngql,psql,fql").getValue
}
2.5 Configure JDBC script variable storage and parsing
If this operation is not done, the variables in the JDBC script cannot be stored and parsed normally, and the code execution will fail when ${variable} is directly used in the script!

// Maintain the variable relationship between codeType and runType through CODE_TYPE_AND_RUN_TYPE_RELATION in the CodeAndRunTypeUtils tool class

val CODE_TYPE_AND_RUN_TYPE_RELATION = CommonVars("wds.linkis.codeType.runType.relation", "sql=>sql|hql|jdbc|hive|psql|fql,python=>python|py|pyspark,java=>java,scala=>scala,shell=>sh|shell")
Refer to PR:https://github.com/apache/linkis/pull/2047
2.6 Add JDBC engine text prompts or icons to the Linkis administrator console interface engine manager
web/src/dss/module/resourceSimple/engine.vue
methods: {
  calssifyName(params) {
     switch (params) {
        case 'jdbc':
          return 'JDBC';
        ......
     }
  }
  // 图标过滤
  supportIcon(item) {
     const supportTypes = [
         ......
        { rule: 'jdbc', logo: 'fi-jdbc' },
      ];
  }
}
The final effect presented to the user:

2.7 Compile, package, install and deploy the JDBC engine
An example command for JDBC engine module compilation is as follows:
cd /linkis-project/linkis-engineconn-pluginsjdbc

mvn clean install -DskipTests
When compiling a complete project, the new engine will not be added to the final tar.gz archive by default. If necessary, please modify the following files:
linkis-dist/package/src/main/assembly/assembly.xml
<!--jdbc-->
<fileSets>
  ......
  <fileSet>
      <directory>
          ../../linkis-engineconn-pluginsjdbc/target/out/
      </directory>
      <outputDirectory>lib/linkis-engineconn-plugins/</outputDirectory>
      <includes>
          <include>**/*</include>
      </includes>
  </fileSet>
</fileSets>
Then run the compile command in the project root directory:
mvn clean install -DskipTests
After successful compilation, find out.zip in the directories of linkis-dist/target/apache-linkis-1.x.x-incubating-bin.tar.gz and linkis-engineconn-pluginsjdbc/target/.
Upload the out.zip file to the Linkis deployment node and extract it to the Linkis installation directory /lib/linkis-engineconn-plugins/:
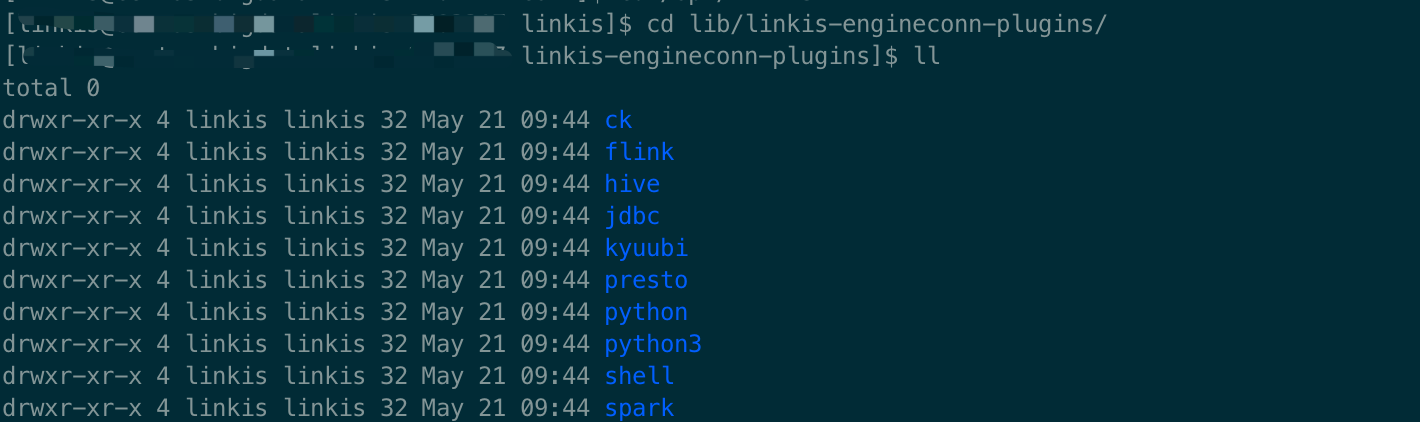
Don't forget to delete out.zip after decompression, so far the engine compilation and installation are completed.
2.8 JDBC engine database configuration
Select Add Engine in the console
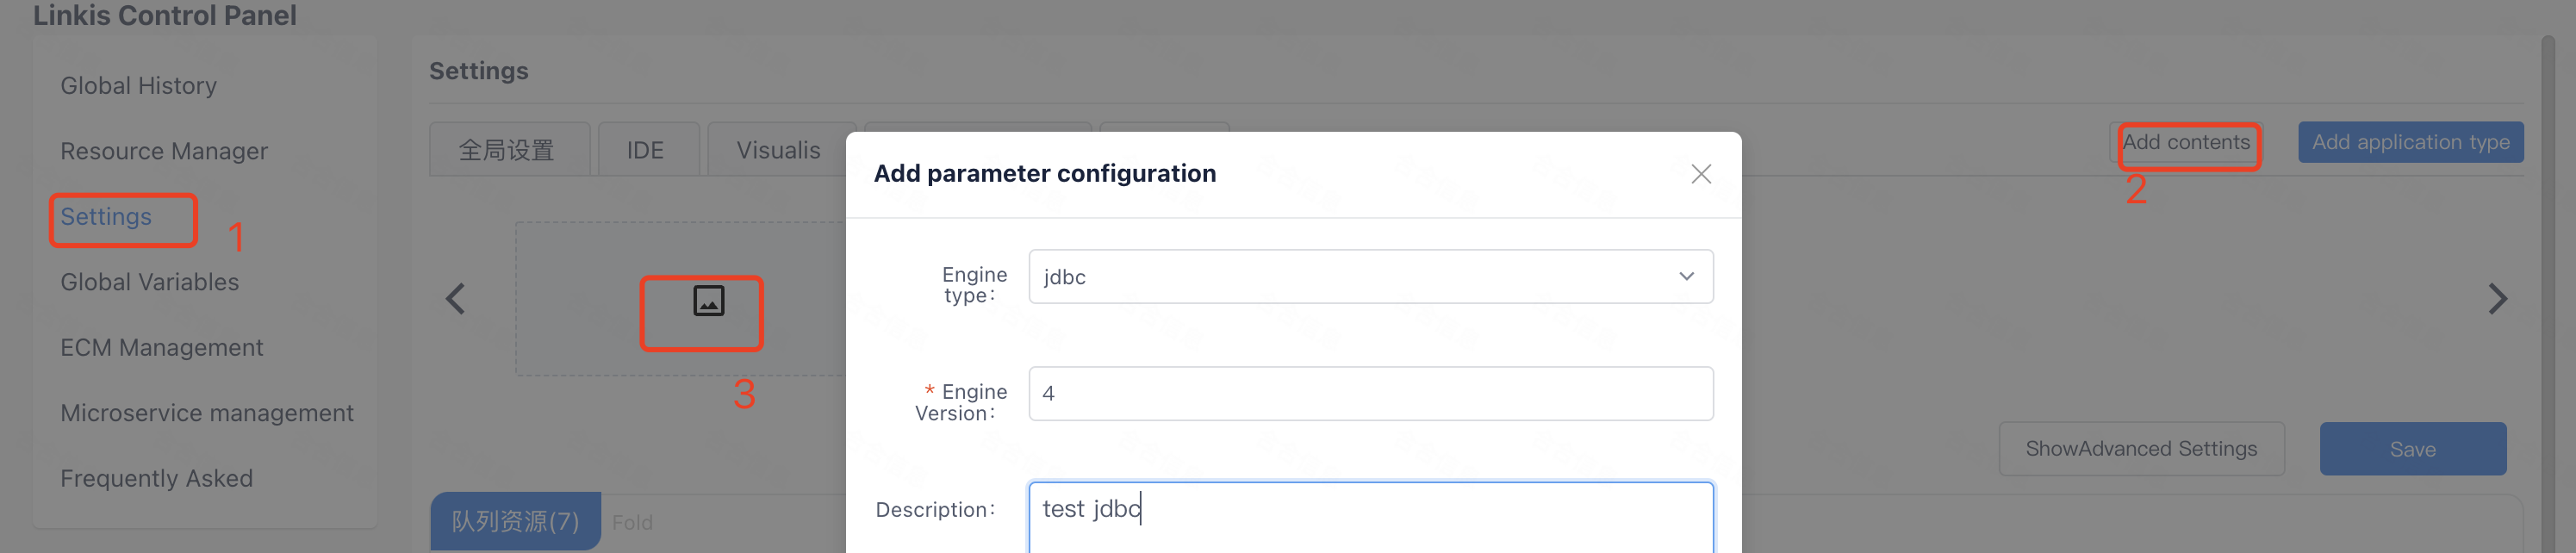
If you want to support engine parameter configuration on the management console, you can modify the database according to the JDBC engine SQL example.
The JDBC engine is used here as an example. After the engine is installed, if you want to run the new engine code, you need to configure the database of the engine. Take the JDBC engine as an example, please modify it according to the situation of the new engine you implemented yourself.
The SQL reference is as follows:
SET @JDBC_LABEL="jdbc-4";

SET @JDBC_ALL=CONCAT('*-*,',@JDBC_LABEL);
SET @JDBC_IDE=CONCAT('*-IDE,',@JDBC_LABEL);
SET @JDBC_NODE=CONCAT('*-nodeexecution,',@JDBC_LABEL);

-- JDBC
INSERT INTO `linkis_ps_configuration_config_key` (`key`, `description`, `name`, `default_value`, `validate_type`, `validate_range`, `is_hidden`, `is_advanced`, `level`, `treeName`, `engine_conn_type`) VALUES ('wds.linkis.rm.instance', '范围:1-20,单位:个', 'jdbc引擎最大并发数', '2', 'NumInterval', '[1,20]', '0', '0', '1', '队列资源', 'jdbc');

insert into `linkis_ps_configuration_config_key` (`key`, `description`, `name`, `default_value`, `validate_type`, `validate_range`, `is_hidden`, `is_advanced`, `level`, `treeName`, `engine_conn_type`) VALUES ('wds.linkis.jdbc.driver', '取值范围:对应JDBC驱动名称', 'jdbc驱动名称','', 'None', '', '0', '0', '1', '数据源配置', 'jdbc');
insert into `linkis_ps_configuration_config_key` (`key`, `description`, `name`, `default_value`, `validate_type`, `validate_range`, `is_hidden`, `is_advanced`, `level`, `treeName`, `engine_conn_type`) VALUES ('wds.linkis.jdbc.connect.url', '例如:jdbc:hive2://127.0.0.1:10000', 'jdbc连接地址', 'jdbc:hive2://127.0.0.1:10000', 'None', '', '0', '0', '1', '数据源配置', 'jdbc');
insert into `linkis_ps_configuration_config_key` (`key`, `description`, `name`, `default_value`, `validate_type`, `validate_range`, `is_hidden`, `is_advanced`, `level`, `treeName`, `engine_conn_type`) VALUES ('wds.linkis.jdbc.version', '取值范围:jdbc3,jdbc4', 'jdbc版本','jdbc4', 'OFT', '[\"jdbc3\",\"jdbc4\"]', '0', '0', '1', '数据源配置', 'jdbc');
insert into `linkis_ps_configuration_config_key` (`key`, `description`, `name`, `default_value`, `validate_type`, `validate_range`, `is_hidden`, `is_advanced`, `level`, `treeName`, `engine_conn_type`) VALUES ('wds.linkis.jdbc.connect.max', '范围:1-20,单位:个', 'jdbc引擎最大连接数', '10', 'NumInterval', '[1,20]', '0', '0', '1', '数据源配置', 'jdbc');

insert into `linkis_ps_configuration_config_key` (`key`, `description`, `name`, `default_value`, `validate_type`, `validate_range`, `is_hidden`, `is_advanced`, `level`, `treeName`, `engine_conn_type`) VALUES ('wds.linkis.jdbc.auth.type', '取值范围:SIMPLE,USERNAME,KERBEROS', 'jdbc认证方式', 'USERNAME', 'OFT', '[\"SIMPLE\",\"USERNAME\",\"KERBEROS\"]', '0', '0', '1', '用户配置', 'jdbc');
insert into `linkis_ps_configuration_config_key` (`key`, `description`, `name`, `default_value`, `validate_type`, `validate_range`, `is_hidden`, `is_advanced`, `level`, `treeName`, `engine_conn_type`) VALUES ('wds.linkis.jdbc.username', 'username', '数据库连接用户名', '', 'None', '', '0', '0', '1', '用户配置', 'jdbc');
insert into `linkis_ps_configuration_config_key` (`key`, `description`, `name`, `default_value`, `validate_type`, `validate_range`, `is_hidden`, `is_advanced`, `level`, `treeName`, `engine_conn_type`) VALUES ('wds.linkis.jdbc.password', 'password', '数据库连接密码', '', 'None', '', '0', '0', '1', '用户配置', 'jdbc');
insert into `linkis_ps_configuration_config_key` (`key`, `description`, `name`, `default_value`, `validate_type`, `validate_range`, `is_hidden`, `is_advanced`, `level`, `treeName`, `engine_conn_type`) VALUES ('wds.linkis.jdbc.principal', '例如:hadoop/host@KDC.COM', '用户principal', '', 'None', '', '0', '0', '1', '用户配置', 'jdbc');
insert into `linkis_ps_configuration_config_key` (`key`, `description`, `name`, `default_value`, `validate_type`, `validate_range`, `is_hidden`, `is_advanced`, `level`, `treeName`, `engine_conn_type`) VALUES ('wds.linkis.jdbc.keytab.location', '例如:/data/keytab/hadoop.keytab', '用户keytab文件路径', '', 'None', '', '0', '0', '1', '用户配置', 'jdbc');
insert into `linkis_ps_configuration_config_key` (`key`, `description`, `name`, `default_value`, `validate_type`, `validate_range`, `is_hidden`, `is_advanced`, `level`, `treeName`, `engine_conn_type`) VALUES ('wds.linkis.jdbc.proxy.user.property', '例如:hive.server2.proxy.user', '用户代理配置', '', 'None', '', '0', '0', '1', '用户配置', 'jdbc');

INSERT INTO `linkis_ps_configuration_config_key` (`key`, `description`, `name`, `default_value`, `validate_type`, `validate_range`, `is_hidden`, `is_advanced`, `level`, `treeName`, `engine_conn_type`) VALUES ('wds.linkis.engineconn.java.driver.cores', '取值范围:1-8,单位:个', 'jdbc引擎初始化核心个数', '1', 'NumInterval', '[1,8]', '0', '0', '1', 'jdbc引擎设置', 'jdbc');
INSERT INTO `linkis_ps_configuration_config_key` (`key`, `description`, `name`, `default_value`, `validate_type`, `validate_range`, `is_hidden`, `is_advanced`, `level`, `treeName`, `engine_conn_type`) VALUES ('wds.linkis.engineconn.java.driver.memory', '取值范围:1-8,单位:G', 'jdbc引擎初始化内存大小', '1g', 'Regex', '^([1-8])(G|g)$', '0', '0', '1', 'jdbc引擎设置', 'jdbc');

insert into `linkis_cg_manager_label` (`label_key`, `label_value`, `label_feature`, `label_value_size`, `update_time`, `create_time`) VALUES ('combined_userCreator_engineType',@JDBC_ALL, 'OPTIONAL', 2, now(), now());

insert into `linkis_ps_configuration_key_engine_relation` (`config_key_id`, `engine_type_label_id`)
    (select config.id as `config_key_id`, label.id AS `engine_type_label_id` FROM linkis_ps_configuration_config_key config INNER JOIN linkis_cg_manager_label label ON config.engine_conn_type = 'jdbc' and label_value = @JDBC_ALL);

insert into `linkis_cg_manager_label` (`label_key`, `label_value`, `label_feature`, `label_value_size`, `update_time`, `create_time`) VALUES ('combined_userCreator_engineType',@JDBC_IDE, 'OPTIONAL', 2, now(), now());
insert into `linkis_cg_manager_label` (`label_key`, `label_value`, `label_feature`, `label_value_size`, `update_time`, `create_time`) VALUES ('combined_userCreator_engineType',@JDBC_NODE, 'OPTIONAL', 2, now(), now());


select @label_id := id from linkis_cg_manager_label where `label_value` = @JDBC_IDE;
insert into linkis_ps_configuration_category (`label_id`, `level`) VALUES (@label_id, 2);

select @label_id := id from linkis_cg_manager_label where `label_value` = @JDBC_NODE;
insert into linkis_ps_configuration_category (`label_id`, `level`) VALUES (@label_id, 2);


-- jdbc default configuration
insert into `linkis_ps_configuration_config_value` (`config_key_id`, `config_value`, `config_label_id`)
    (select `relation`.`config_key_id` AS `config_key_id`, '' AS `config_value`, `relation`.`engine_type_label_id` AS `config_label_id` FROM linkis_ps_configuration_key_engine_relation relation INNER JOIN linkis_cg_manager_label label ON relation.engine_type_label_id = label.id AND label.label_value = @JDBC_ALL);
If you want to reset the database configuration data of the engine, the reference files are as follows, please modify and use as needed:
-- Clear the initialization data of the jdbc engine
SET @JDBC_LABEL="jdbc-4";

SET @JDBC_ALL=CONCAT('*-*,',@JDBC_LABEL);
SET @JDBC_IDE=CONCAT('*-IDE,',@JDBC_LABEL);
SET @JDBC_NODE=CONCAT('*-nodeexecution,',@JDBC_LABEL);

delete from `linkis_ps_configuration_config_value` where `config_label_id` in
                                                           (select `relation`.`engine_type_label_id` AS `config_label_id` FROM `linkis_ps_configuration_key_engine_relation` relation INNER JOIN `linkis_cg_manager_label` label ON relation.engine_type_label_id = label.id AND label.label_value = @JDBC_ALL);


delete from `linkis_ps_configuration_key_engine_relation`
where `engine_type_label_id` in
      (select label.id FROM `linkis_ps_configuration_config_key` config
          INNER JOIN `linkis_cg_manager_label` label
              ON config.engine_conn_type = 'jdbc' and label_value = @JDBC_ALL);


delete from `linkis_ps_configuration_category`
where `label_id` in (select id from `linkis_cg_manager_label` where `label_value` in(@JDBC_IDE, @JDBC_NODE));


delete from `linkis_ps_configuration_config_key` where `engine_conn_type` = 'jdbc';

delete from `linkis_cg_manager_label` where `label_value` in (@JDBC_ALL, @JDBC_IDE, @JDBC_NODE);
Final effect:
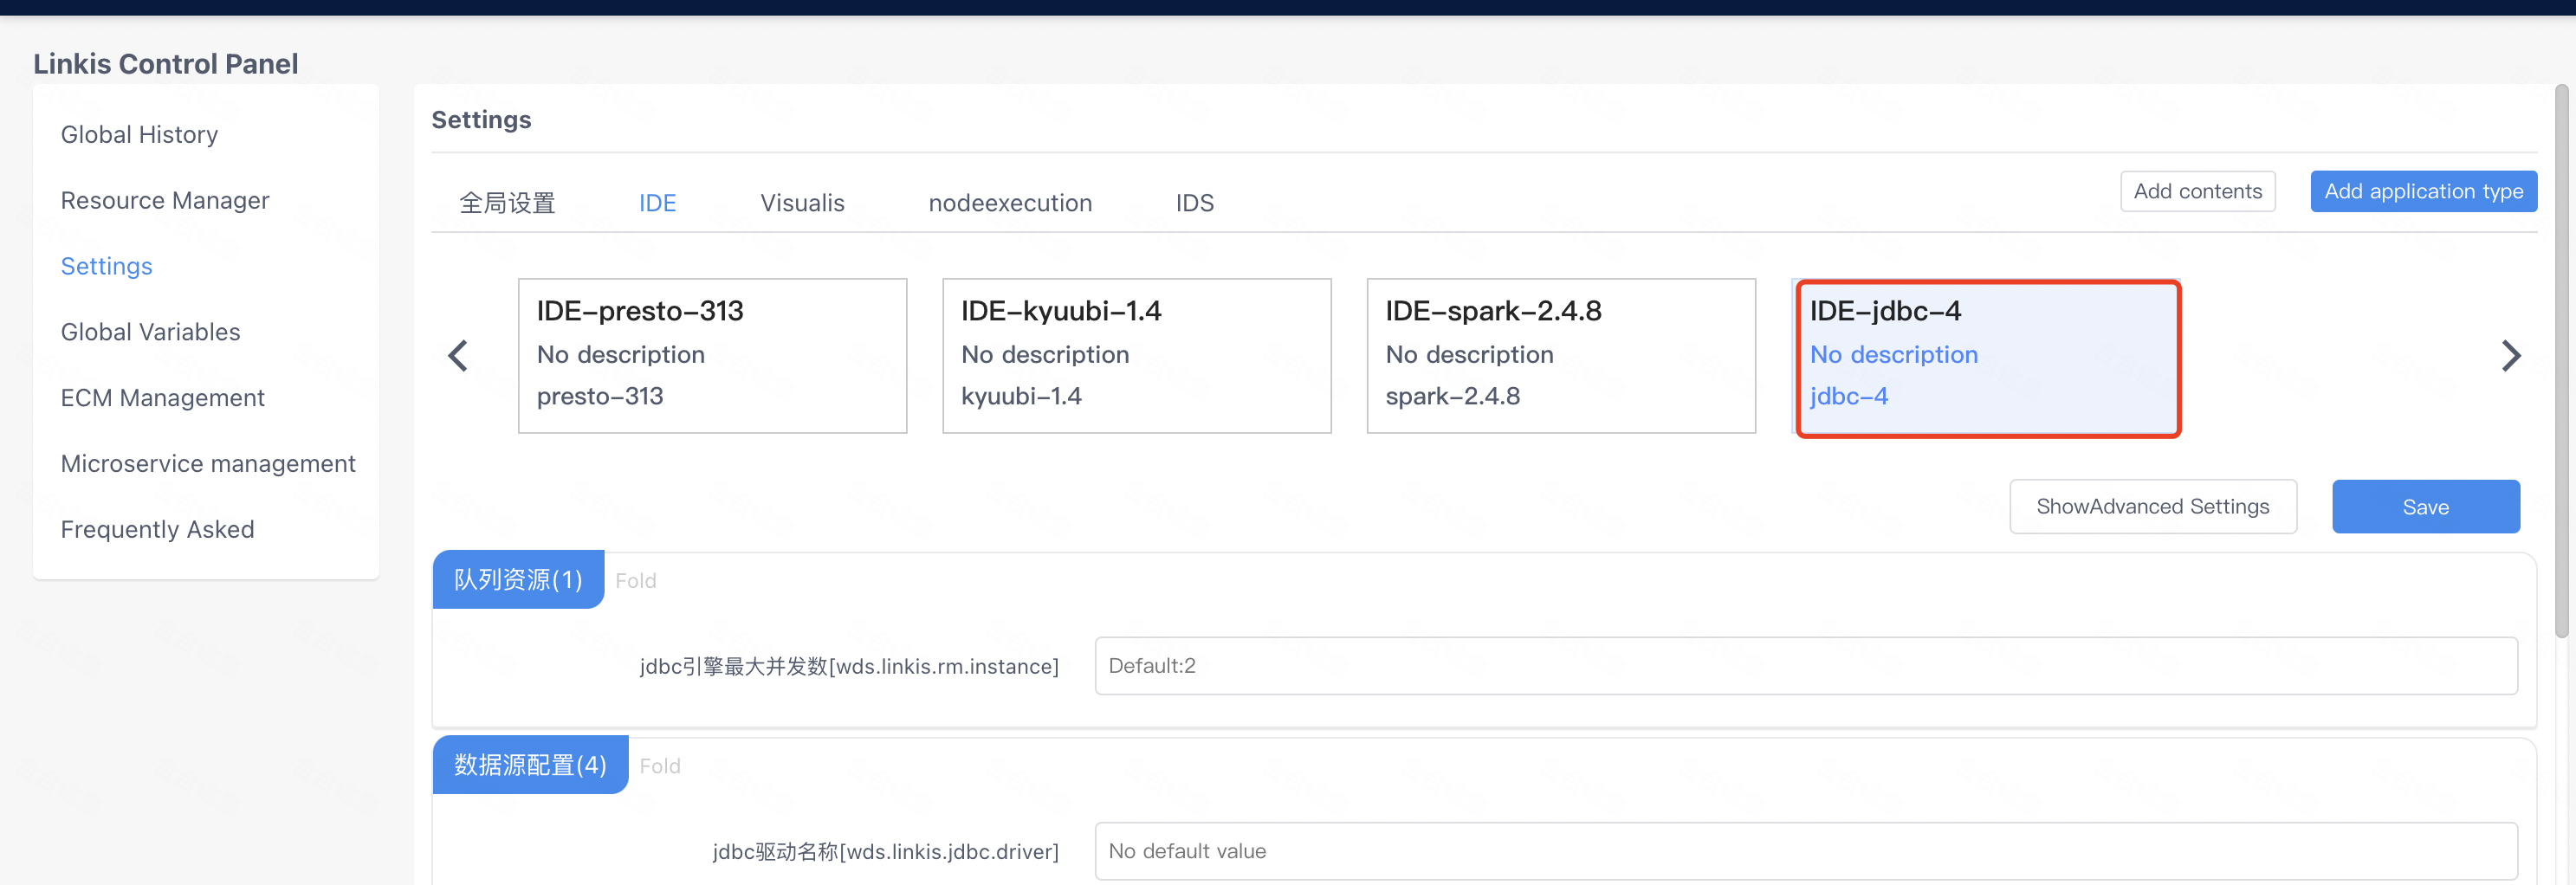
After this configuration, when linkis-cli and Scripts submit the engine script, the tag information of the engine and the connection information of the data source can be correctly matched, and then the newly added engine can be pulled up.
2.9 Added JDBC script type and icon information in DSS Scripts
If you use the Scripts function of DSS, you also need to make some small changes to the front-end files of the web in the dss project. The purpose of the changes is to support creating, opening, and executing JDBC engine script types in Scripts, as well as implementing the corresponding engine. Icons, fonts, etc.
2.9.1 scriptis.js
web/src/common/config/scriptis.js
{
  rule: /\.jdbc$/i,
  lang: 'hql',
  executable: true,
  application: 'jdbc',
  runType: 'jdbc',
  ext: '.jdbc',
  scriptType: 'jdbc',
  abbr: 'jdbc',
  logo: 'fi-jdbc',
  color: '#444444',
  isCanBeNew: true,
  label: 'JDBC',
  isCanBeOpen: true
},
2.9.2 Script copy support
web/src/apps/scriptis/module/workSidebar/workSidebar.vue
copyName() {
  let typeArr = ['......', 'jdbc']
}
2.9.3 Logo and font color matching
web/src/apps/scriptis/module/workbench/title.vue
  data() {
    return {
      isHover: false,
      iconColor: {
        'fi-jdbc': '#444444',
      },
    };
  },
web/src/apps/scriptis/module/workbench/modal.js
let logoList = [
  { rule: /\.jdbc$/i, logo: 'fi-jdbc' },
];
web/src/components/tree/support.js
export const supportTypes = [
  // Probably useless here
  { rule: /\.jdbc$/i, logo: 'fi-jdbc' },
]
Engine icon display
web/src/dss/module/resourceSimple/engine.vue
methods: {
  calssifyName(params) {
     switch (params) {
        case 'jdbc':
          return 'JDBC';
        ......
     }
  }
  // 图标过滤
  supportIcon(item) {
     const supportTypes = [
                ......
        { rule: 'jdbc', logo: 'fi-jdbc' },
      ];
  }
}
web/src/dss/assets/projectIconFont/iconfont.css
.fi-jdbc:before {
  content: "\e75e";
}
The control here should be:
![]()
Find an svg file of the engine icon
web/src/components/svgIcon/svg/fi-jdbc.svg
If the new engine needs to contribute to the community in the future, the svg icons, fonts, etc. corresponding to the new engine need to confirm the open source agreement to which they belong, or obtain their copyright license.
2.10 Workflow adaptation of DSS
The final result:
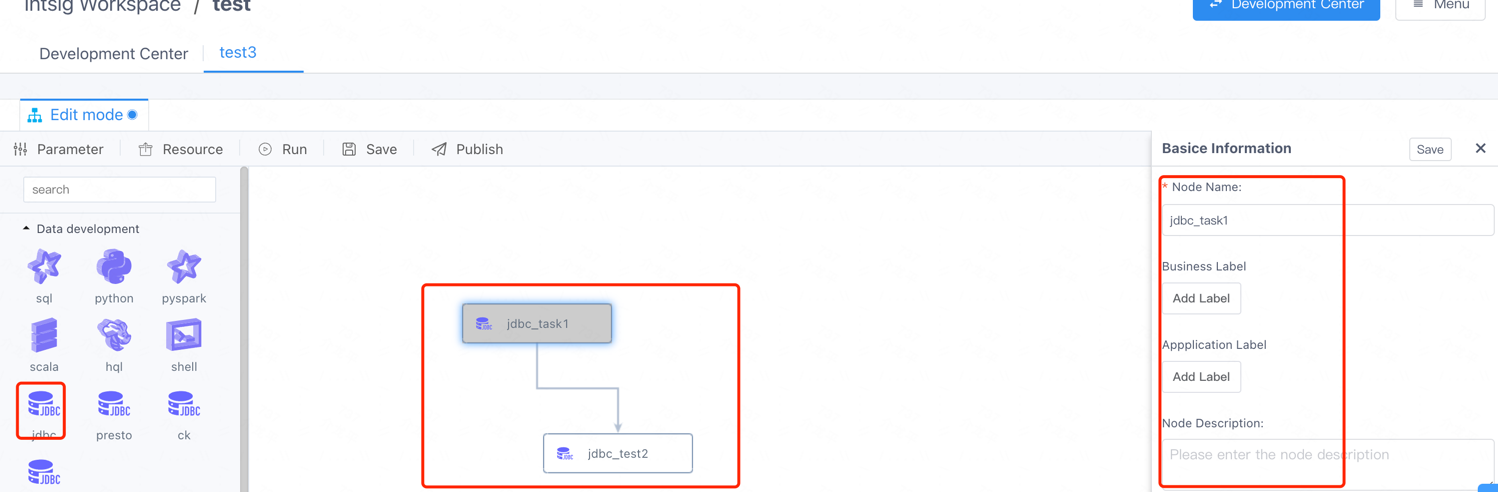
Save the definition data of the newly added JDBC engine in the dss_workflow_node table, refer to SQL:
-- Engine task node basic information definition
insert into `dss_workflow_node` (`id`, `name`, `appconn_name`, `node_type`, `jump_url`, `support_jump`, `submit_to_scheduler`, `enable_copy`, `should_creation_before_node`, `icon`) values('18','jdbc','-1','linkis.jdbc.jdbc',NULL,'1','1','1','0','svg文件');

-- The svg file corresponds to the new engine task node icon

-- Classification and division of engine task nodes
insert  into `dss_workflow_node_to_group`(`node_id`,`group_id`) values (18, 2);

-- Basic information (parameter attribute) binding of the engine task node
INSERT  INTO `dss_workflow_node_to_ui`(`workflow_node_id`,`ui_id`) VALUES (18,45);

-- The basic information related to the engine task node is defined in the dss_workflow_node_ui table, and then displayed in the form of a form on the right side of the above figure. You can expand other basic information for the new engine, and then it will be automatically rendered by the form on the right.
web/src/apps/workflows/service/nodeType.js
import jdbc from '../module/process/images/newIcon/jdbc.svg';

const NODETYPE = {
  ......
  JDBC: 'linkis.jdbc.jdbc',
}

const ext = {
    ......
  [NODETYPE.JDBC]: 'jdbc',
}

const NODEICON = {
  [NODETYPE.JDBC]: {
    icon: jdbc,
    class: {'jdbc': true}
  },
}
Add the icon of the new engine in the web/src/apps/workflows/module/process/images/newIcon/ directory
web/src/apps/workflows/module/process/images/newIcon/jdbc
Also when contributing to the community, please consider the lincese or copyright of the svg file.
3. Chapter Summary
The above content records the implementation process of the new engine, as well as some additional engine configurations that need to be done. At present, the expansion process of a new engine is still relatively cumbersome, and it is hoped that the expansion and installation of the new engine can be optimized in subsequent versions.